
Artificial intelligence (AI) has become synonymous with innovation. However, knowing how to introduce AI to your business can be a daunting prospect. Thankfully (and contrary to popular belief), integrating AI into your processes does not need to involve sophisticated systems or complex coding.
In fact, there are numerous simple AI integrations that can be readily incorporated into your existing business processes to streamline and automate your business operations. With AI, you can enhance efficiency, reduce errors, improve customer service, and ultimately drive growth.
Read on for some easy and accessible ideas to kick-start your AI journey.
If you haven’t already played around with ChatGPT, it’s a great place to start familiarising yourself with what Generative AI is capable of. Best of all you can get started for free by heading over to https://chat.openai.com and creating a free account.
ChatGPT is essentially a chatbot, so once you’re logged on to your free account, don’t be shy. Go ahead and start asking it some questions. Here are some ideas to get you started:
The more you play with ChatGPT the more ideas you’ll come up with, I guarantee it! Once you’ve got the hang of it, consider encouraging your staff to also have a play, and come up with ideas for how they could use it in their daily activities. At Grassroots IT our engineers regularly use ChatGPT to help write friendly and professional emails to our clients, which has made a noticeable difference to the effectiveness of our communication.
Once you’re comfortable with ChatGPT, here are some power tips to help level up your AI game:
Microsoft Power Automate is powerful tool in the Microsoft 365 platform that allows businesses to leverage AI’s capabilities for advanced process automation. As a cloud-based service, Power Automate provides an intuitive platform to create, manage, and customise workflows that automate repetitive tasks.
The real strength of Power Automate lies in its AI Builder, a no-code AI capability that enables you to infuse artificial intelligence into your workflows. With AI Builder, you can automate tasks such as form processing, prediction modelling, text classification, and more.
For example, if your business deals with a high volume of invoices, you could use Power Automate with AI Builder to create a process that automatically captures and processes data from these invoices, significantly reducing manual data entry. Or, in a customer service context, AI Builder can be used to create a workflow that automatically triages incoming customer emails and directs them to the appropriate department, increasing efficiency and improving customer service response times.
Power Automate’s integration capabilities with a wide range of popular apps and services also means that your AI-powered workflows can connect with the tools you use every day. Whether it’s saving attachments from Outlook emails to OneDrive, creating tasks in Microsoft Teams based on flagged emails, or syncing data with non-Microsoft platforms, Power Automate allows you to create holistic automated processes that simplify your business operations.
If you’re anything like me, it sometimes feels like you spend half your working day bouncing from one meeting to the next, leaving no time to gather your thoughts, review your notes and work out who needs to do what next!
This is where Otter.ai steps in as your handy AI meeting assistant. Otter uses AI-powered speech recognition technology to automatically transcribe and organise meeting notes in real-time, so you don’t have to. You can even import your existing calendar appointments and let Otter join the meeting for you, taking care of all the notetaking while you focus on actively participating in the discussion.
With its ability to identify different speakers and tag sections of the conversation, Otter makes it easy to quickly find specific information within your notes. And with its collaboration features, you can easily share and collaborate on your meeting notes with colleagues, making sure everyone is on the same page.
The important thing to understand about AI is that using it to streamline business operations is now table-stakes. Even if you’re not using AI yet, rest assured that your competition is. The good news is that integrating AI into your business can be surprisingly quick and easy. I encourage you to explore some of the ideas shared above, and if Grassroots IT can be of any assistance, contact us today.
Power Automate is a tool for automating repetitive and time-consuming tasks. As part of the Microsoft Power Platform, it can integrate quickly and easily into other Microsoft apps such as SharePoint and Outlook but can just as easily integrate with hundreds of non-Microsoft apps using an extensive collection of third-party and custom connectors. Even older legacy apps can be automated using a feature called Robotic Process Automation.
Power Automate is designed to automate repetitive and time-consuming business tasks. Not only does every organisation already have a range of these tasks being actioned manually every day, but there are often numerous business opportunities that are simply never pursued due to the perceived complexity and expense of the manual processes that would be required.
Handling these tasks manually is not only an expensive approach but can also introduce significant time delays and potential for human error. By automating these tasks, you can not only move staff onto more fulfilling and valuable activities, but also enjoy having the tasks done almost instantly and with perfect consistency.
Discovering new levels of efficiency with automation can deliver real gains, however the true value of Power Automate is in its ability to integrate multiple apps and systems together into a single unified and automated workflow. You no longer need to be constrained to the functionality built into a single app but can instead pull together the features and functionality of multiple apps and tie them all together using Power Automate. When used in this way the resulting process or workflow can truly be greater than the sum of its parts.
Any computer-based process is a potential candidate for automation, especially those that use modern apps and cloud services such as Microsoft 365. Some examples of simple process automation are:
Far more complex business processes and workflows are also candidates for automation, using some of the more advanced functionality of Power Automate, such as Robotic Process Automation (RPA) and AI Builder. An excellent example of an advanced use case is presented in this Microsoft Case Study where Coca-Cola entirely automated a manual and complex business process using Power Automate, RPA and AI Builder, avoiding having to hire 10 new full-time employees for mundane data processes tasks.
The potential for empowering your people to do more with less using Power Automate is huge, but sometimes it is hard to know how to get started. Rest assured there are numerous opportunities in every organisation for improvement through automation. Here are some tips to help identified where those opportunities lie in your business.
Check out all the Power Automate Connectors that are available, looking for any apps that you already use in your business processes. Click on each connector for inspiration from the templates and examples provided.
Consider any repetitive, data-entry style tasks you may have. Do you often have to re-key data from one system into another? These tasks make great candidates for automation.
Do you have any frequent but complex, multi-step processes that are well documented? Automation can be ideal for streamlining these.
The good news is that because Power Automate is a no-code platform, you don’t need to be a coding wizard yourself to get started streamlining workflows. Of course for more advanced applications you can always reach out to the Power Automate experts at Grassroots IT for help.
Businesses tend to spend considerable effort on social media, but email is still really important for client communication and marketing. In fact, compared to other marketing channels, email marketing actually has a 4400% ROI which means that for every $1 spent, you generate $38 in revenue. (Campaign Monitor)
Email is an opportunity for us to give a great impression to current or potential clients, so it’s good to put your best foot forward, right?
Perhaps being in a marketing role, I’m a little obsessed with branding consistency, but when I see various font styles, sizes and colours being used in the communications from one single organisation, I could just put my face in my hand.
So when it comes to setting up email signatures that are consistent across all members of your organisation, we have a great tool for you. That is not only easy to set up, but is great value for money.
Enter: Exclaimer.
Exclaimer is an email signature management software that allows users to have central control over email signatures across an organisation. The software helps maintain a more consistent branding and content for emails.
With Exclaimer, you can design an email signature template that fits your company branding and current goals and it’s easily set up via a web interface. This web-based interface allows authorised users to edit from any device and at any given time. Once an email signature is all set up and ready, Exclaimer can automatically add this email signature every time a member of the organisation sends out an email, ensuring that all email marketing efforts are more streamlined across all members of the organisation.
The best thing about having Exclaimer is that it doesn’t require HTML skills. With a drag and drop type web interface, anyone can easily create a high quality, branded email signature by using one of the readily available templates or by creating your own unique layout. All there is left to do is to add in logos, images (such as employee headshots) and other information you want to appear in the email signature and Exclaimer will do the hard work in the background.
Here’s a quick walkthrough to how Exclaimer lets you easily create consistent email signatures:
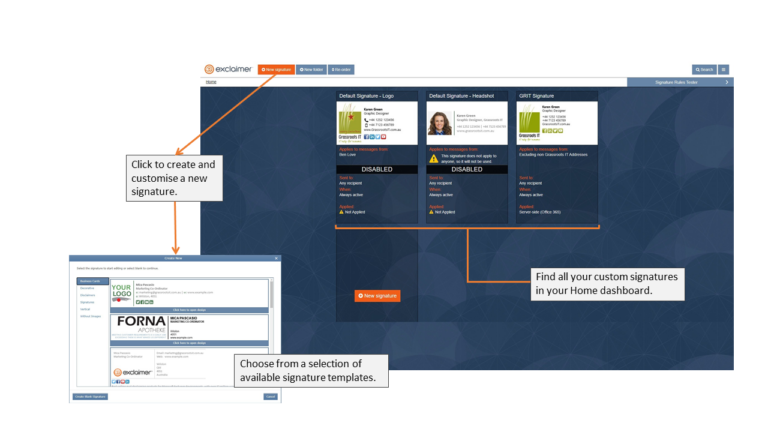
Here’s where you can find all of your signature creations. Here, you can organise them with names or move them into folders. You can also manage your email signature functions like email recipients, date/time triggers and more. You can also find the “New Signature” button on your Home dashboard which will lead you to another window that lets you choose what type of email signature to create.
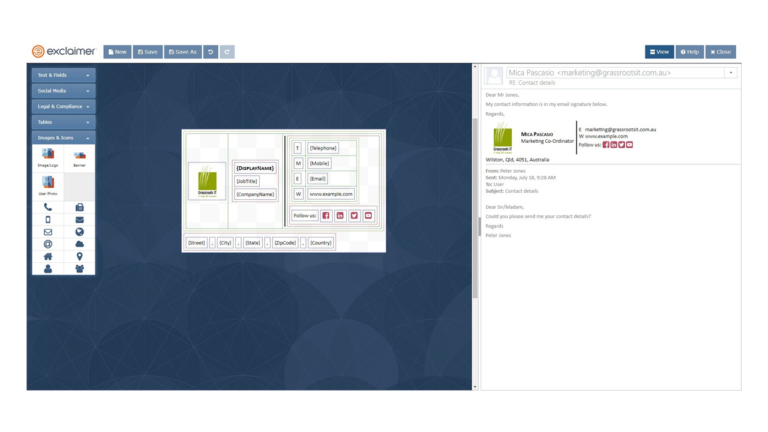
Once you’ve chosen from the many available templates, you will be taken to the Template Designer page where you can do all the customisations you want. Exclaimer’s convenient tools let you drag and drop elements into your signature so you can go wild with your signature design. Don’t worry about going TOO wild with the elements you’re adding to your layout, though, because you can find a real-time preview of your email signature on the right pane of the page to ensure it’s correct before it goes live.
Exclaimer email signatures can be customised for different teams, for replies or new messages, or for internal or external messages. You can even base rules on data only Exchange can capture, including the email recipient or the sender.
At Grassroots IT, we use Exclaimer to set fun, holiday themes to our organisation’s email signature like this:

Or add a link to register for our latest webinar or event. We can add important notes too, such as a legal disclaimer or latest opening hours. This way we’re assured that the whole team is sending out the same up-to-date information while maintaining our consistent branding.
Exclaimer is designed to work on any device so that users won’t have to worry about the consistency of email signatures no matter what device the email is sent from. Since it’s a cloud-based product, it can be accessed from anywhere in the world using either a PC, MAC, laptop, tablet or mobile phone whilst maintaining the high quality of email signatures.
Exclaimer also offers its services to a variety of users making it easily available no matter what platform you’re using to send your emails. So don’t worry about your organisation using Gsuite, Office 365, or Outlook, etc. because Exclaimer would work perfectly on any platform.
This’ll be good news. Exclaimer is pretty darn cheap! Subscriptions start at a minimum of 10 users and initially costs around US$2 per user, per month. You can find a pricing metre from the Exclaimer website to see actual costs. Considering all the value a business can get from this product, including minimal setup time for streamlined email signatures across the whole organisation, it offers great value for your money.
No. Exclaimer doesn’t send the emails for its users because it’s not an email management software. Your emails, however, run through Exclaimer so your customised email signatures can be added on while the email itself stays securely within its email server. Think of Exclaimer as a drive-thru for email signatures.
Below is a visual map of how Exclaimer processes your emails from your Office 365 and back:
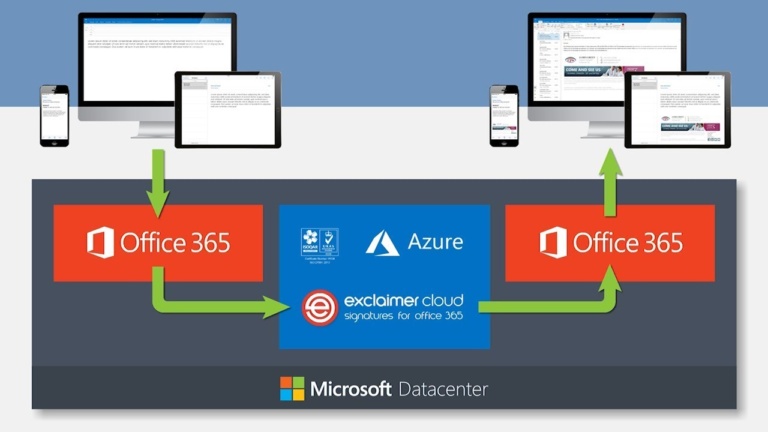
Exclaimer fully integrates with your company’s Active Directory, providing consistent contact information across all email signatures.
Managing your email signatures on Exclaimer means that you’re eliminating inconsistencies in your email content that may negatively affect your email engagement, the effectiveness of your message and your business in general.
Have you ever received a new registration to your event that was actually held six months ago? Then you figure out one of your staff members hasn’t removed the event registration link from their email signature yet. Or perhaps a client marks your emails as Spam because the email signature looks a bit dodgy and not on brand. These are problems that can easily be solved by keeping your email signatures controlled centrally.
Having one place to manage all your email signatures across staff members can keep your branding consistent and leverage your email marketing activities. Exclaimer is (from our experience) the easiest, cheapest and best tool for that job.
If you’d like to arrange a free trial of Exclaimer email signature manage and see just how simple it is to use, get in touch today.
There is one app on my iPhone that I now simply cannot live without. The app is called Office Lens and it is available for free at the Apple App Store and for your Android phone on Google Play.
In a nutshell, the Office Lens app is a portable scanner in your pocket. Now, these kinds of apps aren’t new. You have Evernote, Scanbot and no doubt a variety of other flavours available to you on your Smartphone but where Office Lens shines is in its tight integration with the Office 365 suite.
If you are rocking Office 365, odds are that you already enjoy the mobility and agility of access to all your documents and productivity applications from anywhere on your phone. Here is another tool in your toolbox to get the most out of the modern workplace.
Here are just some of the ways that I have personally used Office Lens in the past few weeks:
I have been fortunate to attend some fascinating road shows hosted by cloud companies who are making fantastic presentations up on the big screen. Problem is, you’re often seated at a weird angle off to the side, right? You will see people snapping pics of the big screen at these kind of events, which is a great way of capturing the information. But, if you are using Office Lens, the image will automatically identify, keystone (correct the angle of the image for ease of viewing) and save with an optimised image where you can store it away in a OneNote file to annotate and comment so that you can more easily document and retain all of the cool stories on display.
Collected a pile of business cards at that networking event? Snap them in Office Lens and the app will automatically identify the printed text with optical character recognition (OCR) and generate contacts that you can add right into your phone. Handy.
When compiling expenses, having to dig out all those paper receipts can be tedious. Instead of being monopolising the office scanner in a scanning marathon, Office Lens enables you to snap a photo with your phone at the time. Office Lens will automatically crop, enhance and clean up the image and export it to your OneDrive as a PDF document ready to attach to your expense claim. Job done.
Sounds good, right? But how do you do it?
Have you given Office Lens a run yet? I’d love to hear how you are using it in your business.
