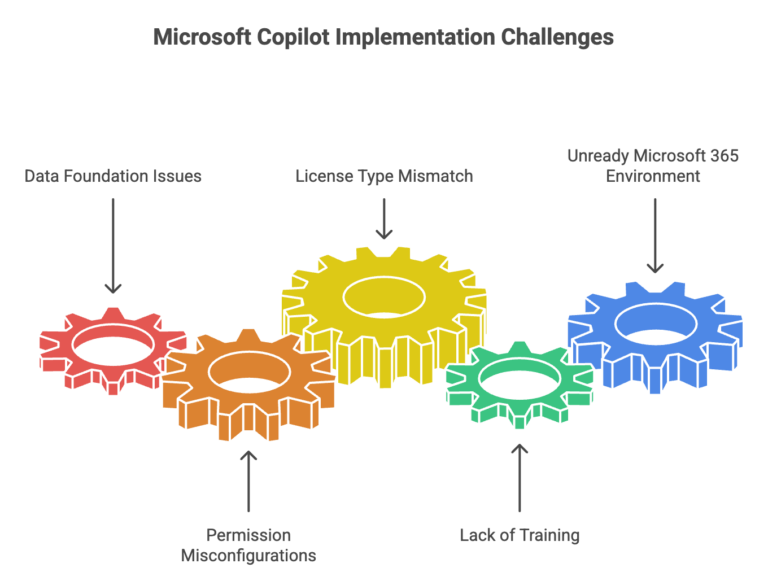

The clearest indicator that Excel reporting has become counterproductive is when data preparation consumes more time than data analysis. Australian businesses typically reach this tipping point when they’re spending several hours each month just gathering and formatting data before meaningful analysis can begin. Other warning signs include team members working with different versions of the same report, creating compliance risks around data accuracy, and critical business intelligence depending on one person’s Excel expertise.
The real expense isn’t in the technology—it’s in the compound effect of small inefficiencies.
For example:

These aren’t dramatic failures—they’re quiet productivity drains that accumulate into significant competitive disadvantages. While your team manages information chaos, your competitors with streamlined systems are focusing that same energy on winning new clients, securing funding, and scaling operations.
Smart business leaders approach information management the same way they approach any other critical business function: strategically. A well-designed information architecture directly influences:
Effective Collaboration Techniques:

Successful information management transformation requires approaching the challenge strategically rather than tactically. This means starting with clear business outcomes—defining what success looks like in terms of reduced decision-making time, improved project delivery, or enhanced compliance readiness. Smart organisations design for growth from the beginning, ensuring their solution can adapt as teams double in size, expand to multiple locations, or develop more complex approval workflows.
Equally important is planning for adoption by leveraging existing tools and workflows rather than forcing dramatic changes that create resistance. Finally, security must be prioritised from day one, implementing enterprise-grade protections that maintain compliance requirements while actually improving accessibility for authorised users.

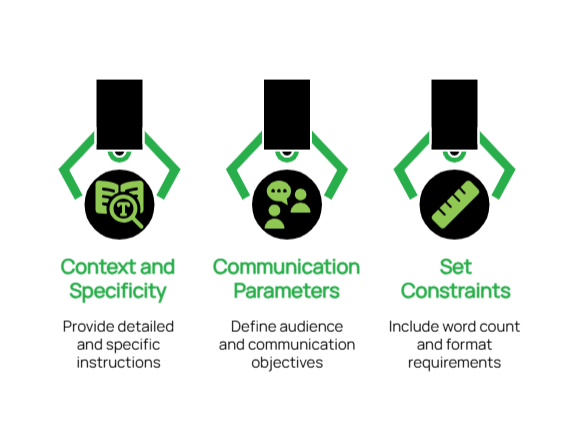
The foundation of effective Copilot utilisation lies in developing clear, purposeful instructions. When your prompts lack precision, the resulting output may fall short of your expectations.
Best Practices for Business-Focused Prompts:
Real-World Applications:
A Non-Profit Organisations: Prompt: “Use Microsoft Copilot to build a checklist in Microsoft 365 that automates thank-you emails to donors. Include steps to personalise messages based on donation amount, connect with our donor database (e.g., Excel or Dynamics 365), and add tracking to measure email engagement like open and click rates.“
Why it works:
This prompt clearly tells Copilot what to automate, how to personalise, and what metrics to track — all within tools non-profits already use.
An Engineering Firm: Prompt: “Write a procedure using Copilot to pull out key specifications from technical documents. Ask it to keep all measurements accurate, highlight any important compliance rules, and point out possible design issues.”
Why it works:
Engineers can quickly get the info they need without missing critical details, helping projects move faster and safer.”
A Medical Practices: Prompt: “Create a Copilot template that turns complex medical procedures into easy-to-read patient handouts. Ask it to keep all medical facts accurate but explain them in plain language that patients can understand.”
Why it works:
Patients feel more informed and confident, and staff spend less time rewriting the same explanations.
This foundation of precise, context-rich prompting transforms Copilot from a generic assistant into a strategic partner that understands your specific industry requirements and delivers consistently relevant results.
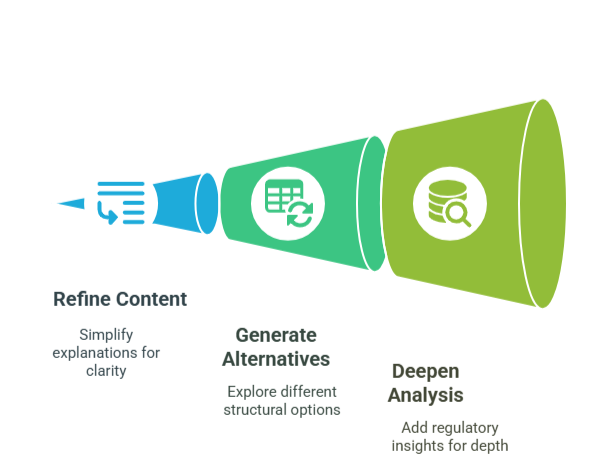
Think of Copilot as a collaborative partner rather than a one-time tool. By having back-and-forth conversations with it, you’ll refine your ideas and create better content.
Effective Collaboration Techniques:
Practical Examples:
Initial Request: “Draft an email template reminding clients about their upcoming appointments.”
Follow-up Refinement: “Revise the template to include a brief explanation of how coming prepared benefits them and what documents they should bring.”
Final Enhancement: “Add a friendly section about our rescheduling policy that emphasises flexibility while reducing last-minute cancellations.”
Initial Request: “Create an outline for our monthly project status report.”
Follow-up Refinement: “Expand the ‘Challenges’ section to include more thoughtful questions about resource allocation.”
Final Enhancement: “Add a forward-looking section that helps team members anticipate next month’s priorities based on current progress.”
This collaborative methodology ensures that your initial ideas evolve into polished, professional communications that align with your strategic objectives and resonate with your intended audience.
One of Copilot’s most valuable capabilities is its ability to optimise your existing content, ensuring clarity, consistency, and strategic alignment across all business communications.
Key Enhancement Applications:
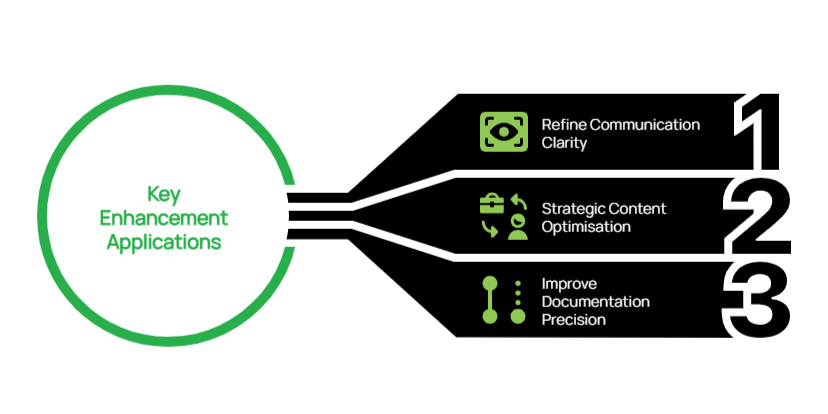
Demonstrated Value:
For Non-Profit Leadership: Original Content: “Here’s the volunteer schedule for next month.”
Enhancement Prompt: “Improve this schedule with a more engaging introduction paragraph that thanks our volunteers and explains how their time contributes to our mission.”
Enhanced Output: “Thank You for Your Dedication! This schedule represents more than just dates and times—it’s a roadmap for community impact. Each shift you serve directly supports our mission to improve literacy rates in underserved communities. We’ve highlighted key events where your participation will make an exceptional difference.”
For Project Management: Original Content: “Here’s the technical specification document for the project.”
Enhancement Prompt: “Add a brief executive summary at the beginning that explains the business benefits in non-technical language.”
Enhanced Output: “Executive Summary: This project aims to significantly decrease customer wait times while also reducing operational costs. The technical improvements outlined in this document directly address the key customer pain points identified in our recent satisfaction survey, without requiring additional staffing resources.”
By systematically enhancing existing content, you can leverage these assets more effectively, ensuring every document serves both immediate operational needs and broader strategic communication goals.
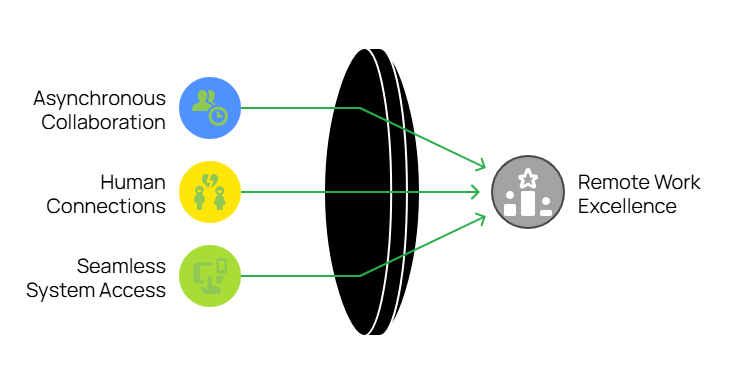
For dispersed teams, especially those spanning multiple time zones, asynchronous work is essential. It allows team members to contribute meaningfully without being online simultaneously.
Practical strategies you can implement today:
Microsoft Teams allows team members to record and share short video messages directly in chats—perfect for explaining complex concepts or demonstrating processes without coordinating schedules.
Pro tip: For more detailed screen recordings, consider Loom as a complementary tool for step-by-step process documentation.
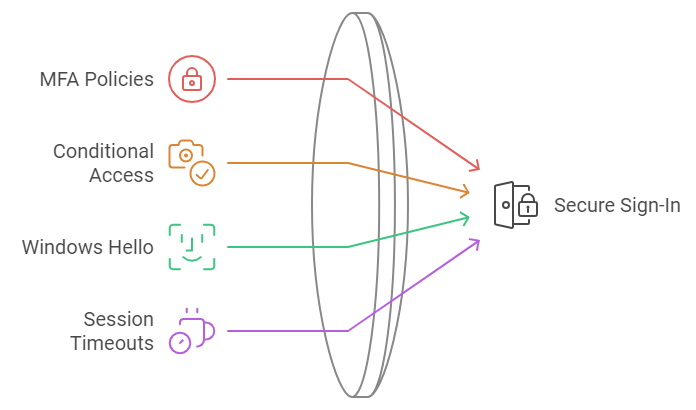

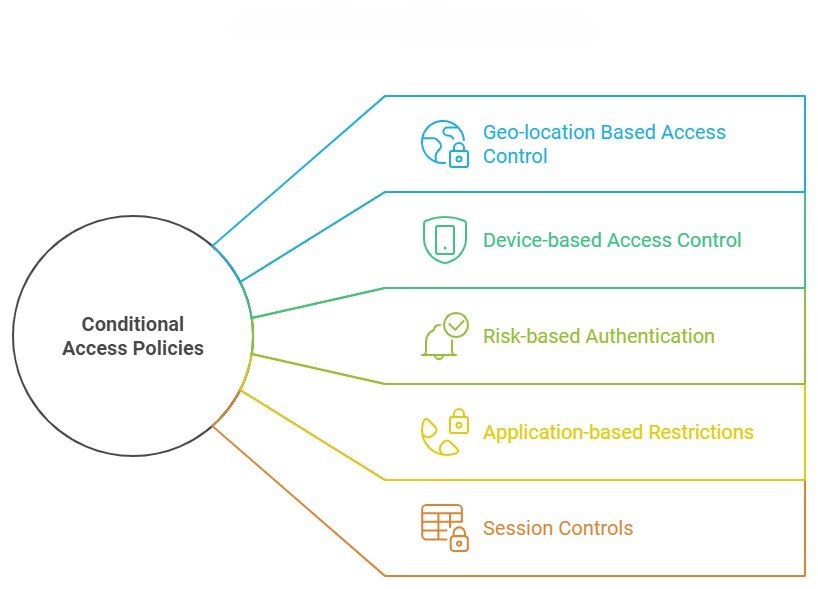
Let’s explore five keyways that Conditional Access Policies can dramatically improve your cybersecurity posture:
One of the most powerful features of Conditional Access Policies is the ability to restrict access based on geographic location.
How it works: You can set policies that only allow access from specific countries or regions where your business operates. Attempts to access your resources from other locations can be blocked or require additional verification.
Ensuring that only trusted devices can access your resources is another crucial aspect of cybersecurity.
How it works: Conditional Access Policies can be set to only allow access from devices that are managed by your organisation or that meet certain security requirements.
Why it matters: This prevents scenarios where an employee might access sensitive company data from a personal device that lacks proper security measures. It also mitigates risks associated with lost or stolen devices. This is particularly important in the context of your organisation’s BYOD policy.
Microsoft’s cloud intelligence can detect signs of suspicious activity, which Conditional Access Policies can use to adjust authentication requirements in real-time.
How it works: If a login attempt is flagged as high-risk (e.g., it’s from an unfamiliar location or shows signs of bot activity), the policy can require additional verification steps or block access entirely.
Why it’s powerful: This adaptive approach means that routine, low-risk activities aren’t disrupted, but potential threats are met with appropriate security measures.
Not all company resources are equally sensitive. Conditional Access Policies allow you to set different access requirements for different applications or data types.
How it works: You might set a policy that allows broad access to the company intranet but requires multi-factor authentication and a company-managed device to access financial systems.
Conditional Access doesn’t stop working after the initial authentication. It can also control what users can do during their sessions.
How it works: Policies can be set to limit activities like downloading, printing, or copying data from certain applications, even after a user has been granted access.
Why it matters: This can prevent data exfiltration attempts, where a bad actor who has gained access tries to download large amounts of sensitive data.