
As businesses increasingly migrate to digital platforms, cybersecurity has become a non-negotiable priority. Microsoft 365 leads the way in providing security solutions and offers an abundance of features designed to safeguard your business data and systems, but how do you navigate the range of options available to ensure that you’re choosing the best security measures for your specific needs without feeling overwhelmed? Enter Microsoft Secure Score.
Just as the name suggests, Microsoft Secure Score is a built-in tool that not only scores your security posture but also recommends actions for improvement. With Secure Score, enhancing your cybersecurity is no longer a daunting task but a series of quick, actionable wins that will strengthen your defence line further against potential threats.
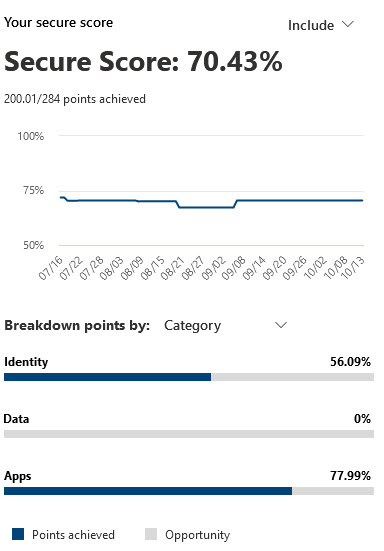
Secure Score is a free tool that comes with Microsoft 365 that analyses your organisation’s security stance based on your unique use of Microsoft 365 services. It provides a numerical score, along with a detailed breakdown, of how well you are implementing the recommended security controls. Quite simply, the higher your Secure Score, the lower your risk level.
Secure Score monitors Identity, Apps, Data, and Devices in Microsoft 365, helping you to report on the current state of your security posture, suggest improvements by providing guidance, visibility and control, and compare yourself against similar sized organisations.
Importantly, it does not simply focus on one specific area of security in your Office 365 environment. Instead, it looks at all products available under your current licensing and providing recommended actions across multiple areas. Recommendations are presented in an easy-to-understand dashboard, grouped by product, and sorted by the impact the recommended change will have on improving the security of your Microsoft 365 environment. This approach makes it easy to focus your efforts in the right area and avoid spending unnecessary time on actions that won’t move the needle as much.
Key features of include:
Secure Score provides actionable security recommendations tailored to an organisation’s specific environment. These recommendations cover areas like identity and access management, data protection, threat detection, and more.
Each recommended security improvement comes with a point value. By implementing the recommendations, your organisation can earn points and increase your Score.
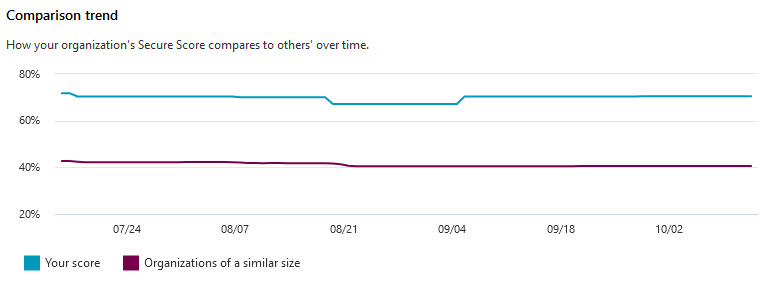
Secure Score allows you to compare your security posture with industry benchmarks and similar organisations. This feature provides valuable insights into how well you are performing relative to your peers.
The tool integrates with Microsoft Threat Protection, offering real-time threat intelligence and helping you stay ahead of emerging threats.
The system maintains a historical record of progress, enabling you to visualize your security journey and measure improvements over time.
Microsoft Secure Score provides high impact recommendations to improve your cybersecurity posture, usually requiring little or no additional expense. Rather than requiring new and additional security services, Secure Score simply helps you to make the most of the features that you already have access to within the Microsoft 365 platform.
Importantly, Secure Score may help you reduce your cyber-insurance premiums. With cyber-insurance becoming a vital piece of any cybersecurity strategy, many insurers are now recognising the value of Microsoft Secure Score and factoring it in when calculating insurance premiums. Improve your Secure Score and you can potentially reduce your cyber-insurance premiums.
Not only that, but if your organisation aligns with one of the recognised cybersecurity frameworks, such as the Essential Eight, improving your Secure Score can also positively impact your alignment with your chosen framework.
You can find your Secure Score in the Microsoft Defender Portal. Navigating the portal is quite intuitive, allowing you to focus on the insights and recommendations provided. Importantly, each recommended action also provides details on how the action will impact your security standing, along with any potential user impact.
Recommendations may range from reviewing an existing policy to implementing changes that may have a significant impact on users completing everyday tasks. As with all such changes, it’s important that you carefully assess the recommendation and consider the potential impact on operations.
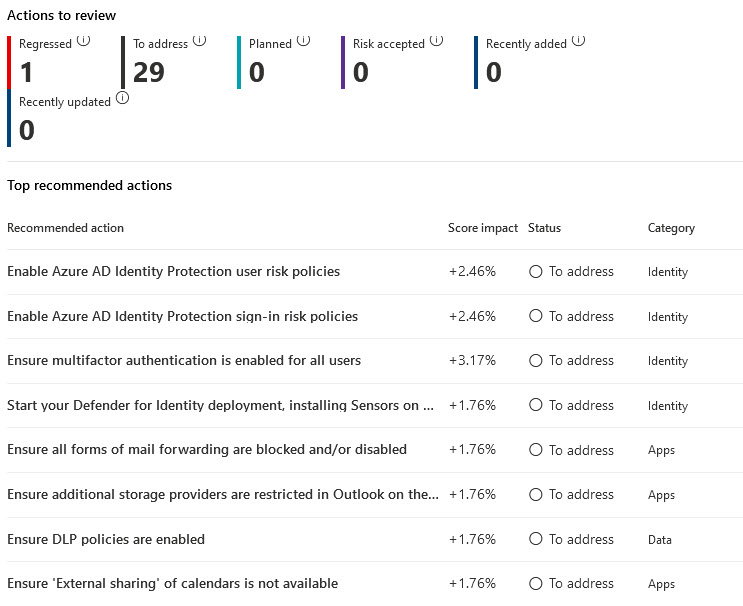
When embarking on a process of change, it’s important to measure and demonstrate progress over time. Thankfully the Secure Score portal provides a historical view of your organisations score over the last 90 days, showing a trend line that makes sudden changes easily visible. A list of recommended actions is also shown, showing when there was a change to each action, if points were gained or lost and allowing you to understand sudden changes in score.
The Secure Score dashboard shows different metrics and trends, where an action may have regressed, recent decreases, points achieved, along with a comparison against similar sized organisations. Metrics and trends can be shown over 7, 30, & 90 days or using a custom date range and can be filtered based on the 4 main categories Secure Score applies against.
Unfortunately, there are too many stories of (easily avoided) problems being created when security changes are made without proper consideration. One story that we’ve heard too many times is when an over-enthusiastic sysadmin has enabled multi-factor authentication or conditional access policies within Microsoft 365 without properly preparing the organisation: thus effectively locking many, if not all, staff out of the system. Problems like this are easily avoided though, with appropriate forethought and planning.
For many clients we find that an effective approach is to develop a roadmap of changes based on the Secure Score recommendations, and then progressively work through these changes over a period of weeks, reviewing improvements in their Secure Score as they go. Some changes may be quick and easy to implement, while others may require more careful management, such as technical change control and user training. By approaching this as a progressive roadmap of smaller actions you can ensure ongoing improvement while managing the risk of disruption.
Grassroots IT recently helped a mid-sized non-profit organisation that was struggling with their systems. They reported inconsistent user experience across their Tenant, no defined settings for users when accessing systems and their users didn’t trust that they could easily access Office 365. When a review was conducted of the organisation’s Secure Score, it was immediately apparent that there were problems with both Identity and Apps within their tenant.
Utilising the recommended actions in Secure Score, Grassroots IT was able to implement multiple changes to their environment that made the user experience easier while also improving their overall security posture. Some of these changes included simplifying the user login process, enabling self-serve password recovery and using a single authentication service for apps. At the same time, multifactor authentication was enabled for all users, and appropriate policies were implemented to protect users from malicious content and emails, significantly improving their Secure Score and security posture.
Microsoft Secure Score is a powerful tool for improving the security of your Microsoft 365 environment. To learn more, speak to us today, or explore some of these additional resources.
Microsoft Office 365 is built from the ground up to be a highly secure platform, but that doesn’t necessarily mean that your own Office 365 environment is configured securely. There are numerous different ways that organisations can use Office 365, and just as many ways that it can be configured.
Ultimately the responsibility for securing your Office 365 environment, and the information and data stored in there, rests with you. Microsoft provides the platform and the means, but it’s up to you to consider your unique situation and ensure that appropriate security measures are taken.
So how do you know if your Office 365 environment is secure? Every organisation is different, and with so many ways of using and securing Office 365 there is no one-size-fits-all solution. The good news is that there are some well-established best-practices that can significantly strengthen the security of your environment.
Here are five critical questions that you need to ask about your Office 365 security to ensure that you’re properly protected.
Let me start by saying that Microsoft has a frustrating habit of changing product names and bundles regularly, which can lead to some confusion. So, for the sake of clarity, let me share a bit of history with you.
First there were the Office 365 plans, offering a suite of products such as Word, Excel, Email and Teams. Then Microsoft added a whole new line of plans called Microsoft 365, which included all the things from Office 365, plus added a whole lot more, mainly to do with security and governance. Then more recently the Office 365 name has been retired entirely, leaving only Microsoft 365 plans to choose from. If you were using Office 365 plans before these changes happened, you will still be on those same Office 365 plans now.
It’s important to understand which Microsoft Office 365 plan you subscribe to, because not all of them have access to the better security features. For most organisations, we recommend that you subscribe to the Microsoft 365 Business Premium plan, or for some larger organisations, the enterprise level Microsoft 365 E3 or Microsoft 365 E5 plans. The important services that are included in these plans (but not the lower plans) are Azure Information Protection and Intune, both of which bring a range of security and data governance capabilities to your environment.
Review all your Microsoft Office 365 subscriptions and consider upgrading any that are not Microsoft 365 Business Premium, E3 or E5 so that you can take advantage of the better security and governance capabilities.
Microsoft Secure Score is a rating of your organisation’s Microsoft 365 security posture, compiled from a range of configurations, metrics and various other data points, depending on what Microsoft 365 plan you subscribe to, and what services you use. The higher the number, the more secure you are.
In addition to a numeric score, the Secure Score dashboard will also provide actionable insights and prioritised recommendations tailored to your unique needs. By following these recommendations, you can progressively improve your Secure Score and strengthen the security posture of your Microsoft 365 environment to provide better protection for your confidential data.
Review your Secure Score and progressively implement the recommendations to improve your score.
Multi-factor authentication (MFA) is an authentication method that requires a user to provide two or more verification factors to prove their identity and gain access to your Microsoft 365 environment, most often a password plus a unique code provided by a separate app.
Despite being one of the most effective cybersecurity measures you can implement in your Microsoft 365 environment, MFA is not always enabled by default or enforced across all accounts. The important point to remember is that your security is only as strong as the weakest link, so for MFA to be most effective it must be enforced on all accounts in your Microsoft 365 environment, not only some of them.
Review all accounts in your Microsoft 365 environment and enable MFA where necessary. Configure Microsoft 365 to enforce MFA on all accounts by default.
Read more: 3 reasons you need to enable Multi-factor Authentication (MFA) today
Every Microsoft 365 environment has one or more “admin” user accounts. These accounts possess elevated privileges that allow them to perform sensitive tasks such as changing system settings and accessing data anywhere across the environment. These admin privileges can be seen as the “keys to the kingdom”, and if allowed to fall into the wrong hands can be exploited to cause significant damage.
User accounts used for everyday tasks such as checking email and editing work documents should never be granted such elevated admin privileges, so as to reduce any potential harm should the account be compromised. Instead, dedicated “admin” accounts should only ever be used for duties requiring elevated security privileges.
Not only does this approach reduce the risk of accidental changes or security breaches, but it also makes it easier to monitor and audit their activities, improving accountability and traceability of any suspicious actions taken within your Microsoft 365 environment.
Review all user accounts in your Microsoft 365 environment for elevated admin privileges and remove such privileges in favor of dedicated admin accounts.
Even with a well secured Microsoft 365 environment, ongoing monitoring and alerting of unusual activity is important for the prevention of a full-blown security incident. Monitoring can help identify a range of suspicious activities, such as multiple failed login attempts, unusual data access or transfers, and changes in user permissions. These could be signs of a brute force attack, data breach, or insider threat.
Moreover, monitoring isn’t just about detection, it’s also about response. When you spot suspicious activity, you can quickly investigate, take corrective action, and learn from the incident to strengthen your defences.
Ensure monitoring is configured within your Microsoft 365 environment, and alerts are sent to the most appropriate person to take action as required.
Microsoft 365 is a highly secure platform, but that doesn’t mean that your organisation’s Microsoft 365 environment is secure by default. Microsoft provides the means, but ultimately, it’s up to you to ensure that your environment is secured appropriately, and that starts with asking the right questions.
If you have questions about your Microsoft 365 security, Grassroots IT can help. Speak with us today.
Microsoft Office 365 is designed from the ground up to enable collaboration and encourage greater team communication. With this philosophy built into every app, it’s not surprising that there is some crossover between what each app can be used for.
Yammer, SharePoint, and Teams can all be used to improve office communication, each adding different value to the process. Here are 5 ideas for how you can use Yammer to connect staff and share ideas.
At Grassroots IT we frequently run internal training sessions. These sessions are normally hosted by one of our team who has a particular expertise, or body of knowledge that we want to share with others.
Recent examples include a refresher session for our helpdesk staff on best practice for managing tickets; an introduction to Privileged Identity Management; and a project handover from our project team to the support team, training them on what they need to know to support a new Azure implementation.
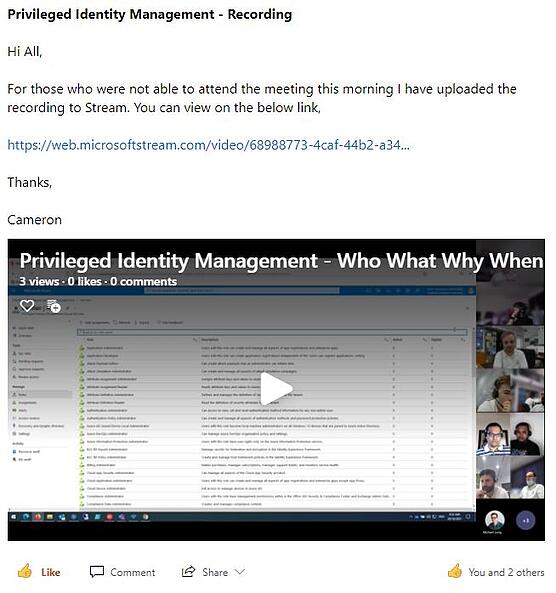
Because our team works across multiple locations, these sessions are always held online via a Teams video call, making them super easy to record. These recordings are then stored in Microsoft Stream and shared in a Yammer post.
With the video available in Yammer, staff who were unable to attend the live session can still join the discussion afterwards, raising any further questions or comments that they may have. Stream also offers the additional benefit of automatic transcription of the audio, providing an easy way to search the video for any particular references.
Every organisation has its subject matter experts. These champions have a particular passion for a topic and enjoy digging deeper and learning all they can. Yammer provides the perfect platform for these experts to share their unique knowledge with the broader team. It helps not only to educate others, but also to celebrate their own contribution to professional development.

In the complex and fast moving world of IT we find posts such as this Weekly Learning Post on the Microsoft Power Platform particularly useful for encouraging learning and further discussion.
It’s often said that two heads are better than one. So if you have a team full of people with diverse and valuable experience, why wouldn’t you use that resource for exploring ideas? Yammer is the perfect platform for encouraging the sharing of ideas across the broader team in an asynchronous way.
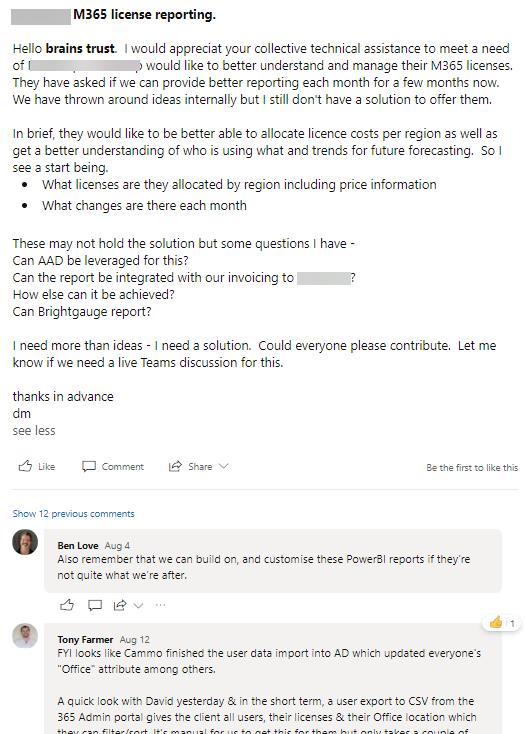
One recent example was when a client wanted greater control of their internal cost allocation of Microsoft 365 licensing. This isn’t something that Microsoft 365 could help with out of the box, but with some collaborative ideation we were able to design a solution that met their needs.
Keeping staff connected across all levels of the organisation can offer significant benefits. It’s particularly important as staff numbers grow, and the risk of communication breakdown increases.
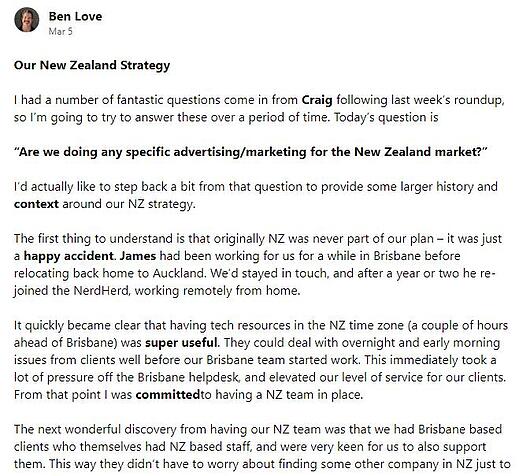
Yammer offers business leaders the ideal platform for keeping staff informed about business performance and strategy, and inviting questions and discussion.
Who says work shouldn’t be fun, right? It’s fascinating to learn more about what our team do with their time. Recently via Yammer we’ve discovered that James grows chilies, David recently completed the trek of a lifetime, and Michael’s mad keen on footy tipping.

If you’d like to know more about how you can use Yammer to connect your staff and better share ideas, contact us today.
When Pam (a busy property manager) broke her wrist roller skating over the weekend, she thought she wouldn’t be able to get back to work at the real estate agency until she got her plaster off.
However what Pam didn’t realise is that Microsoft has some pretty nifty dictation features built into Windows and the Office 365 suite which had her back in action sooner than she expected.
Yes. You can do this with Windows’ dictation feature that uses speech recognition.
This is a speech-to-text tool that provides accessibility to its users and, conveniently, it’s already built in to Windows so you won’t have to install new programs for it to work. Microsoft envisions this tool will support users that are looking for a more accessible alternative to traditional typing.
We don’t want an unfortunate roller skating incident to keep you from getting work done on your PC or mobile device. Here’s how to activate and start using the dictate feature in Windows and Office 365.
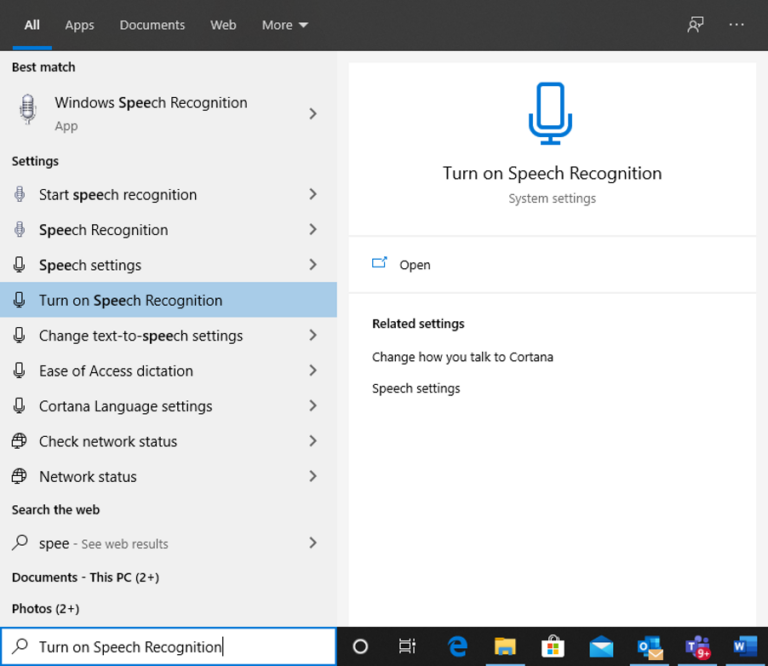
First, you need to make sure that Speech Recognition is enabled on your PC. You can do that by looking up ‘Turn On Speech Recognition’ from your Windows search bar. This will take you to the Speech settings window.
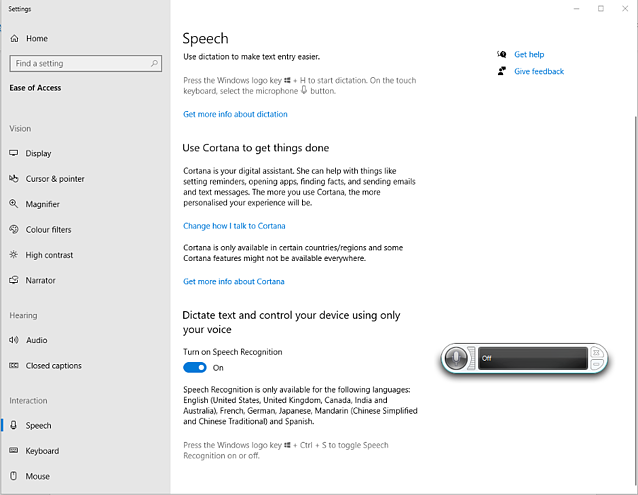
From Speech Settings, see that the toggle marked Turn on Speech Recognition is set to On. If not, click the toggle to turn it on and a speech recognition widget will appear.
Now, you can try using speech-to-text dictation on several apps.
Please note that you need to be connected to the internet to be able to use dictation because it is part of the Azure Cognitive Services. This means that this tool uses utterance from users to further improve the dictation experience.
On a Windows machine, you can utilise Cortana (like Siri on Mac and mobile devices) as your digital assistant to do things such as opening apps, setting reminders and writing emails.
To start dictation, select a program you generate text in (like a Microsoft Word document or an email in Outlook). You can then easily use the hotkey Win+H (Windows icon key then ‘H’) on your keyboard to open the dictate toolbar. You’ll then hear a beep and text on the toolbar saying ‘Listening…’ which means that your dictation service has started.
There are a couple of other ways to activate dictation depending on the app or device you are on.
The dictation feature is most useful in the following Office applications where its main focus is generating text:
(Less helpful in apps like Excel, for obvious reasons).
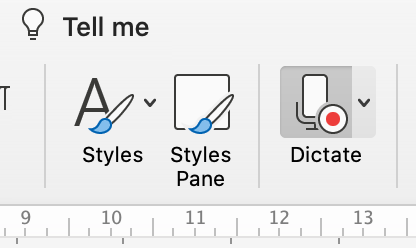
In Microsoft Word, you can find the Dictate button from the Home ribbon.
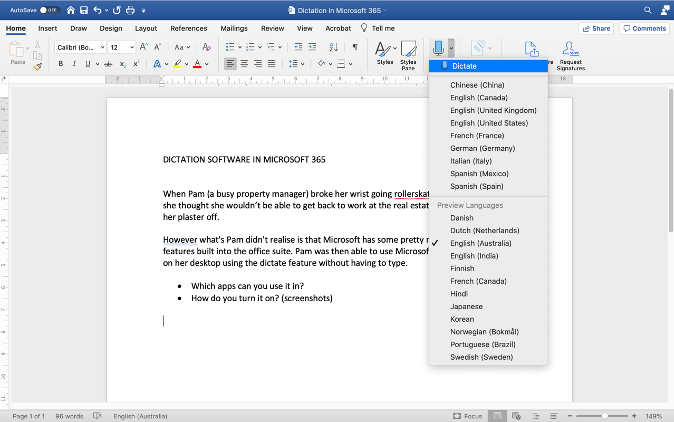
You can click on the arrow down button to show a drop down menu. It offers various language options for you to choose from.
Here’s a short tutorial video to help you navigate the Dictate button on Microsoft Word:
Unlike Word that has a dedicated button for the Dictate feature, the other Office applications mentioned above may need the use of the hot key Win+H for dictation to start. There are also restrictions to the capacity of the dictate tool to respond to certain commands in other Office applications.
In 25 August, 2020, Microsoft announced a new feature called Transcribe in Word which allows you to record or upload audio of conversations and have it automatically transcribed into a Word document. This feature enables users to proactively participate in an oral discussion without the worry of missing out on notes.
The Transcribe feature supports various audio file types like.mp3,.wav,.m4a or.mp4. For now, Transcribe for Word is available at no extra cost using the web version of Word in all Microsoft 365 subscriptions but you can look forward to using it in your Office mobile in the coming months.
If you’re using the Office app on your mobile phone, tablet, or touch screen device, you can select Documents from the main menu and then choose to Dictate in Word.
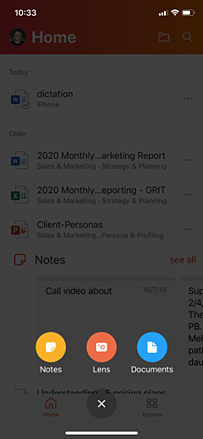
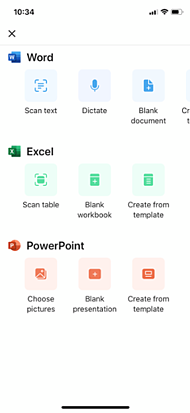
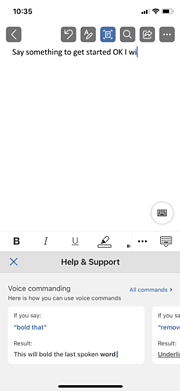
The Help & Support feature within the Office app can provide more tips on voice commands to ensure your dictation experience is more smooth.
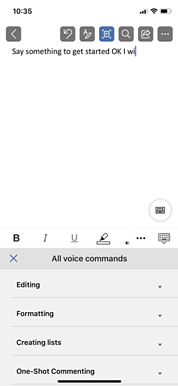
Since the dictation service is part of the Azure Cognitive Services, it is continually improving and expanding its command knowledge. We can list down some of the most common commands you can use using the dictation tool but keep in mind that this list will continue to grow as more people use the tool.
| To do this… | Try saying… |
| Clear section | Clear selection or unselect that |
| Delete the most recent dictation result or currently selected text | Delete that; strike that |
| Delete text, such as the current word | Delete [word] |
| Enter one of the following keys: Tab, Enter, End, Home, Page up, Page down, Backspace, Delete | Tap Enter; press Backspace |
| Select a specific word or phrase | Select [word] |
| Turn spelling mode on and off | Start spelling; stop spelling |
Although dictation can support multiple languages, it can only dictate basic words, symbols, letters, and numbers in seven other languages besides English. The dictation commands mentioned above are available in English only.
To know more about dictation commands, Microsoft has a document source page to help you.
It is believed that our brains work with ideas faster when we speak than when we write or type words. Therefore, this dictation tool opens a potential for better productivity and faster thought process for its users. But keep in mind that there are still windows for error on this one. Like on formatting and grammar.
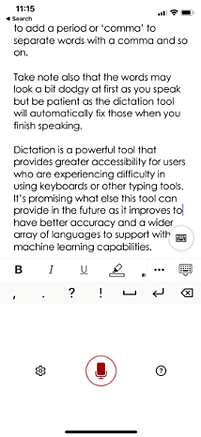
Although it is continually improving to provide a more accurate dictation service, the tool still does listen to what you say and translate it to text as it is without the punctuations you mean to put in between words (unless you say a command to add in the formatting). You can say ‘period’ at the end of your sentence to add a period or ‘comma’ to separate words with a comma and so on.
Take note also that the words may look a bit dodgy at first as you speak but be patient as the dictation tool will often automatically fix those when you finish speaking.
Dictation is a powerful tool that provides greater accessibility for users who are experiencing difficulty in using keyboards or other typing tools. So next time you have a rollerskating accident, you can rest easy knowing that you’ll be back typing (using your voice) before you know it.
It’s promising what else the dictation tool may provide in the future as it improves to have better accuracy and a wider array of languages to support with its machine learning capabilities.
A lot of Microsoft Office 365 plans include what’s called Desktop Licensing. This is the bit that lets you install the Microsoft Office applications such as Word and Excel on your computer. In this post we show you how to install Office 365 on your computer.
1. Sign in with your work or school account at https://portal.office.com/OLS/MySoftware.aspx.
Note: If you don’t see Office listed, your plan probably doesn’t include Office applications. If you know your plan includes Office, you may not have a license assigned. See What Office 365 product or license do I have? If Office is not listed, ask your Office 365 administrator to assign a license to you.
2. On the Office page, set-up which version of Office 2019 you want to install. By default, the 64-bit version is selected. You can change this by clicking on the drop-down box under Version.
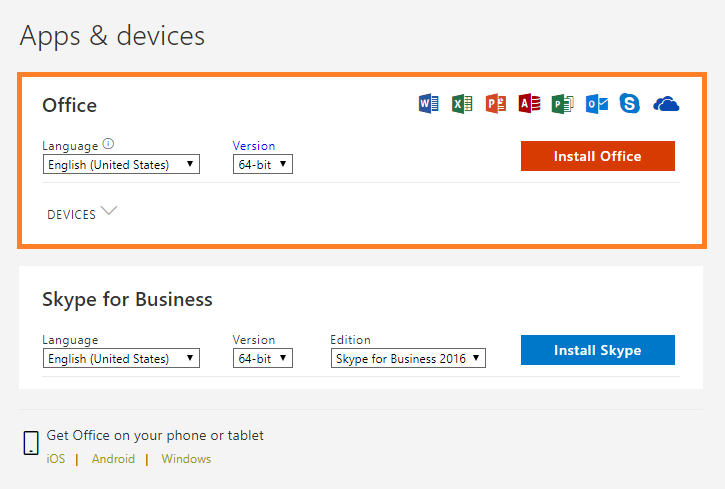
IMPORTANT: The process that installs Office 2019 also uninstalls all Office 2016 products. If you previously have the 32-bit version of Office installed, you should first uninstall this version before upgrading to the 64-bit version.
If you’re not sure which version you currently use, have a look at What version of Office am I using? or if you’d like to know which version you should install, read on Choose between the 64-bit or 32-bit version of Office.
3. Select a preferred Language from the drop down list under Language.
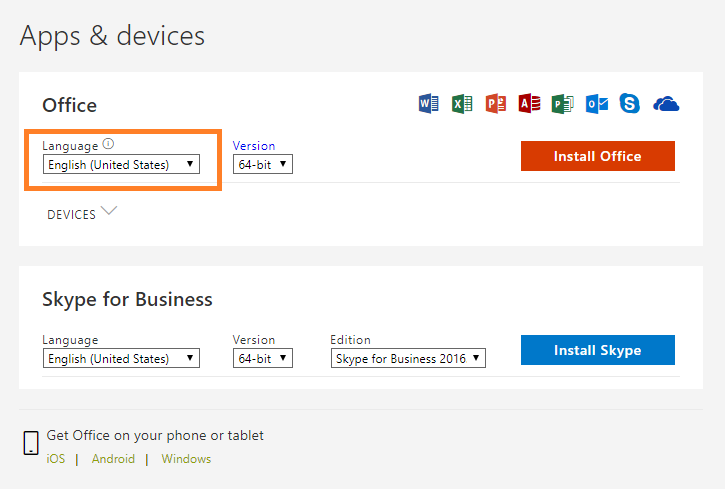
NOTE: If you’re using Edge, first click Save, and then click Run.
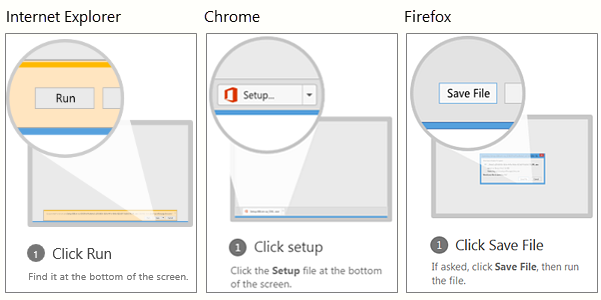
If you see the User Account Control prompt that says, “Do you want to allow this app to make changes to your device?” Click Yes.
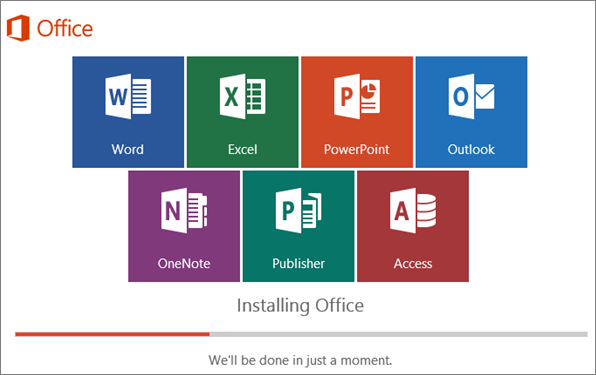
6. The install begins…
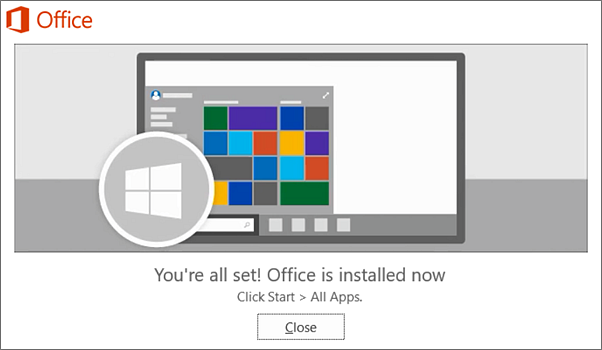
7. Your installation of Microsoft Office 365 is finished when you see the phrase, “You’re all set! Office is installed now”and an animation plays to show you where to find your Office applications on your computer. Follow the instructions in the window.
For example Click Start > All Appsto see where your apps are, and select Close.
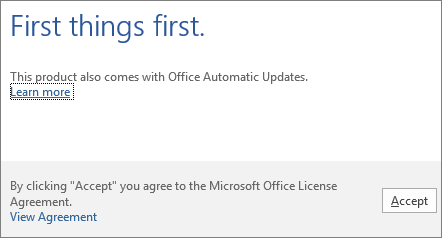
8. Start using an Office application right away by opening any app such as Word or Excel. In most cases, Office is activated once you start an application and after you agree to the License terms agreement by clicking Accept.
Now you’re ready to use Office 365!
If you’re curious as to how other successful businesses utilise the Office 365 suite to the best of their advantage, you can head to one of our free webinars by clicking here or if you’re looking for new features and new ways to work your way around your freshly installed Office 365, click here.
Right when you need professional assistance in your Office 365 journey, we’d be glad to be there and help! Just reach out to us and let’s talk about how you can make the most out of your Office 365.
Are you ready to get solutions that drive positive change to your business? Reach out to us to know more about how we can build these solutions together.
There is one app on my iPhone that I now simply cannot live without. The app is called Office Lens and it is available for free at the Apple App Store and for your Android phone on Google Play.
In a nutshell, the Office Lens app is a portable scanner in your pocket. Now, these kinds of apps aren’t new. You have Evernote, Scanbot and no doubt a variety of other flavours available to you on your Smartphone but where Office Lens shines is in its tight integration with the Office 365 suite.
If you are rocking Office 365, odds are that you already enjoy the mobility and agility of access to all your documents and productivity applications from anywhere on your phone. Here is another tool in your toolbox to get the most out of the modern workplace.
Here are just some of the ways that I have personally used Office Lens in the past few weeks:
I have been fortunate to attend some fascinating road shows hosted by cloud companies who are making fantastic presentations up on the big screen. Problem is, you’re often seated at a weird angle off to the side, right? You will see people snapping pics of the big screen at these kind of events, which is a great way of capturing the information. But, if you are using Office Lens, the image will automatically identify, keystone (correct the angle of the image for ease of viewing) and save with an optimised image where you can store it away in a OneNote file to annotate and comment so that you can more easily document and retain all of the cool stories on display.
Collected a pile of business cards at that networking event? Snap them in Office Lens and the app will automatically identify the printed text with optical character recognition (OCR) and generate contacts that you can add right into your phone. Handy.
When compiling expenses, having to dig out all those paper receipts can be tedious. Instead of being monopolising the office scanner in a scanning marathon, Office Lens enables you to snap a photo with your phone at the time. Office Lens will automatically crop, enhance and clean up the image and export it to your OneDrive as a PDF document ready to attach to your expense claim. Job done.
Sounds good, right? But how do you do it?
Have you given Office Lens a run yet? I’d love to hear how you are using it in your business.
Have you ever experienced that sinking feeling as you realise you have accidentally sent an email to the wrong person?
If you are lucky, it could just be an embarrassing blip on your day, but there is the potential for some very real damage. There is the occasional story on the news, for example the story about the insurance company that accidentally sent out an email dismissing its entire workforce, instead of just firing “Terry from Accounts.”
So yes, sending an email to the wrong person or group can be embarrassing. Fortunately, there are measures you can take to prevent such disasters.
Yes. There are measures that you can take to avoid the embarrassing debacle but regardless of the technology, just like it is with cybersecurity the first line of defence should always be you.
In all cases, you should read the “To”, “CC” and “BCC” fields before you click on that Send button. Check what attachments are in the email and give the content in the body a once over. In fact, maybe write the email first and THEN add the addresses carefully at the end. And then double check that you’ve selected the correct email addresses.
Beware of that ever so helpful feature in Outlook where it autocompletes the address! I was once injected into a river of emails between the management team of a retailer containing discussions about stuff that I really had no business knowing after an employee had unwittingly rapped out “Gary” on their Address field. Even after advising them, I continued to receive emails for some time.
Always proof read your emails.
A very wise manager I once worked with had an excellent tactic to protect himself against the risk of the wayward email. He would set a rule in his Outlook to delay the transmission of his emails and allow himself some time to review and reflect before he pulled the trigger.
It’s not hard to do, and it can help you from some potential bad news be it an email launched into the wrong inbox, or an email to the right inbox that was banged out in haste.
Let’s guide you through how to do it, step-by-step.
How to set a rule to delay emails
1. While composing your message on Outlook, go over the Ribbon and click on the Options

2. Under the Options tab, click Delay Delivery
3. A new window will appear with the delivery properties of your message. You’ll want to go over to the Delivery Option section
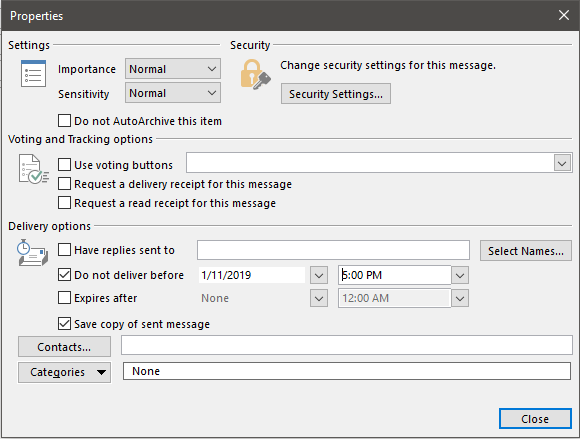
4. Under Delivery Options, pick a date from the date picker of until when you want to delay your email delivery
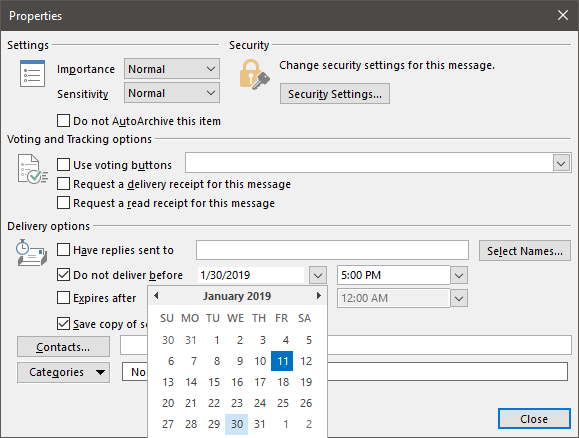
5. After choosing a day on when your email will be delivered, pick a specific time to send it out
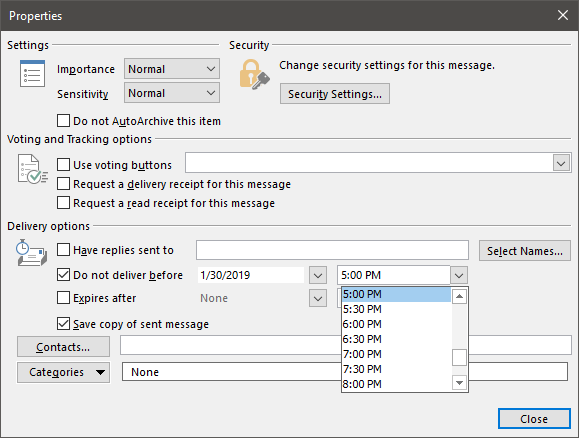
6. Close the window by clicking the Close button on the lower right part
So, you have checked and double checked, and your email is sitting there in the ‘Sent’ tray.
You can try to recall the message from the recipients by using the Recall This Message feature in Microsoft Outlook. This lets you recall, replace or delete the messages sent.
The success or failure of a message being recalled depends largely on their mail system and settings and whether they want to let you recall it, which is probably the single best reason why this method is probably not the best one to use. There’s also the fact that recalling a message will generally inform the recipient that the email exists and highlight the fact that you want to recall it.
You can think of it like stopping a bullet in flight. This is one of your last resorts.
1. From your Sent Items folder, double click the email you’d like to recall.
2. Click on the Actions icon

3. From the Drop-down menu, click on Recall This Message
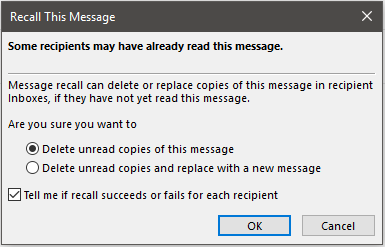
4. A dialog box would then appear to confirm how you want to recall your email
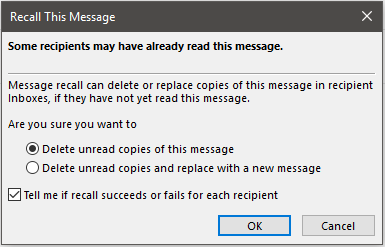
5. You can choose whether you’d like to receive notifications about your recall and track its activity.
6. Close the dialog box by clicking Ok
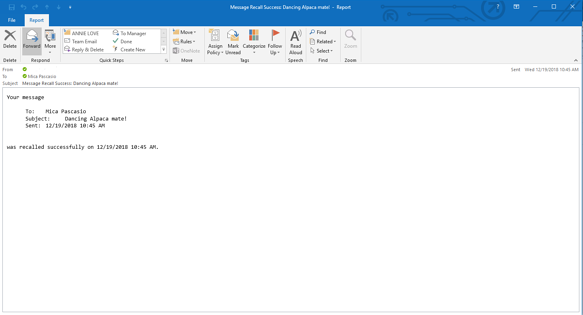
7. If you chose to get a notification, you should get an email confirming that the recall process was a success. It should look like this:
Email disclaimers inform recipients about what they can and cannot do with the emails sent from your organisation. In fact, in North America and Europe having an email disclaimer is now a legal requirement, in Australia it’s simply a matter of good sense.
For sensitive emails, it’s advisable to include a message that states for whom the message is intended and that sharing the content is strictly forbidden. For wayward emails to the random public, a humble request to inform the sender in case the message was intended for someone else will often work.
Here at Grassroots IT we use an excellent tool called Exclaimer! for helping to manage and control the email signatures. It means that we can have a consistent branding for all our email communications and focus on what we like to do, which is to help you do your best work possible through the best possible use of technology. It also means that we can add in and adjust information like disclaimers whenever we need to.
Recalling emails in Outlook is possible, but we recommend it as a last resort. Check, check and recheck before you send: especially if the topic is a bit controversial or includes highly private and confidential information.
For most of us, the goal of achieving Inbox Zero (“a rigorous approach to inbox management, aimed at keeping the inbox empty”) is not an easy task to work on. It’s just a lot to have to go through tons of emails from who-knows-when with the goal of clearing up unwanted emails from your Outlook Inbox then, as soon as you finish halfway through your emails, you start to realise that newer ones are replacing those that you have just removed. So what the heck is the point?
Well, what if I tell you that there’s a way to reduce the amount of redundant emails sitting around your Inbox?
Enter, Microsoft Outlook. There is a feature within Outlook called Conversation Clean Up that helps in clearing out unwanted emails by evaluating the contents of your email conversations. From there, it eliminates any emails with redundant content from previous conversations.
“What the what?!” You might think. Here, let’s go through it in more detail
Does an “email thread” ring a bell? Well that is the quickest definition of an Outlook Conversation. “A Conversation is the complete set of email messages from the first message through all responses. The messages of a Conversation have the same subject.” (source: support.office.com)
Here’s an example, If I send an email to you, then you send me a response with MY original email still attached to YOUR reply then that, my friend, is a Conversation. Here’s a sample image to draw a clearer picture:
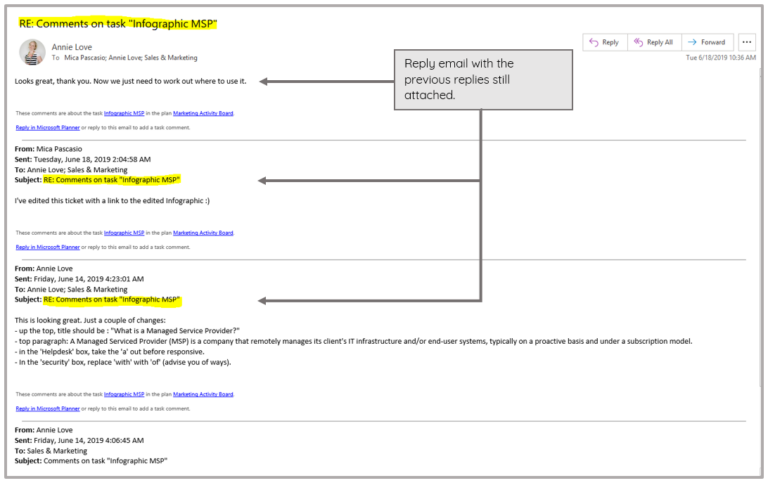
This tool is most helpful with your emails that contains a lot of ping-pong responses, especially those with many recipients. Now, how do you utilise this cool Outlook feature?
“I’d like to remove redundant email messages.”
1. Open your Outlook desktop app.
2. Find one of your emails or email folder that has a lot of back and forth responses, open it.
3. Go to the Home tab.

4. From the Home tab ribbon, find the Delete group.

5. Click on Clean Up (a drop down list will appear).
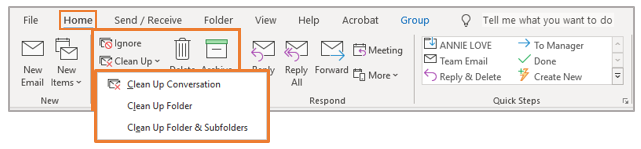
You can select one of the options from the drop-down list:
This is the option for when you want your current Conversation be reviewed, and redundant messages be deleted.
This option allows you to have all email messages in your selected folder be reviewed, and redundant messages be deleted.
This will allow you to have all email messages in your selected folder and its subfolders be reviewed, and redundant messages be deleted.
Not entirely. Once you’ve enabled the Conversation Clean Up on one of your emails, email folders and subfolders, detected redundant messages will be moved to your Deleted folder and not eradicated permanently. If you wish to recover some of the most recently removed emails, you could head to the Deleted folder to find them (although we don’t recommend using your Deleted folder as a storage option!). But remember that the redundant information should still be located in the email you are keeping, that hasn’t been ‘cleaned up.’
You can also set an exception for emails that you do not want to be moved out of your main Inbox. You can find more details on how you can customise your options in one of Microsoft’s support docos available on their page.
There are more ways than one for you to strategize your way to Inbox Zero without having to sacrifice loads of your precious time. Here are a few handy tips:
This may sound cliched but, “Time is Gold.” Especially if you’re running a business, you can’t afford to use up a day or give it an hour just to sort out your overflowing inbox to eliminate the unwanted ones. Ideally, if you make deleting (and unsubscribing from promotional emails you no longer read) a regular habit, it’s less likely you’ll need to deal with tons of emails when you next face your inbox.
Do you feel guilty and anxious when asked to get rid of an old email you’re afraid you might need someday because it has a file attached? Just download all the files and links from emails that you find important so they are safely retained, then delete the email. Magic.
Besides the Conversation Clean Up Tool, there are a lot of tools in Outlook that can help you clean and organise your inbox. You just have to start exploring your Outlook ribbon or head to the handy Outlook help website for more ideas. Or seek for the assistance of your trusted IT partner who can give you pointers on where to find the handy tools.
Like your rubbish at home, you wouldn’t want to keep it hidden under the sink for too long. Once you’ve read an email that can be deleted or you’ve finished a conversation, make sure to get rid of it right away to prevent it from being buried under newer emails that will later on make it harder to find.
Inbox Zero can be a lofty goal, but not unachievable. A daily habit of action to remove unwanted emails and the use of handy tools like Conversation Clean Up can help you keep on top of inbox clutter.
Most people put more thought into their LinkedIn photo than the one attached to their work account, and then wonder why they’re hard to pick out of a Teams meeting grid or an email thread. Your Microsoft 365 profile picture shows up everywhere: Outlook, Teams, SharePoint, the global address list. Set it once and it follows you across all of them.
That matters more than it sounds like it should, especially for organisations with hybrid or remote teams, where a video call or a photo might be the only version of a colleague someone in another office ever sees. A blank grey silhouette, or worse, someone’s photo from a role they left five years ago, does the opposite of what a profile picture is meant to do.
The photo is managed centrally through your Microsoft 365 account rather than separately in each app, so updating it once should update it everywhere.
Depending on which app you’re in when you update it, Outlook and Teams may take a few minutes to catch up. If a colleague still sees your old photo immediately after you’ve changed it, that’s normal. Give it a bit of time, or ask them to refresh the app.
A recent, reasonably well-lit headshot where you’re recognisable is the bar. It doesn’t need to be a professional photography session. It does need to look like you, taken sometime in the last couple of years, ideally with your face clearly visible rather than half in shadow or wearing sunglasses.
If your organisation runs a lot of video calls or has people working across multiple sites, this is a five-minute task worth doing for everyone, not just the people who think to do it themselves. It’s a small thing, but it’s one of the easiest ways to make a distributed team feel less like a directory of names and more like a group of people who know who they’re talking to.
Replacing a phone system is one of those projects that looks simple from the outside. You already pay for Microsoft 365, Microsoft Teams is already open on every desk, and Teams can already make calls. Switching the desk phones off starts to look like a licensing decision rather than a project.
It is not quite that simple, and the gap between “Teams can make calls” and “Teams is our phone system” is where most of the cost and most of the risk sits. This guide covers what a Microsoft Teams phone system actually is, the three ways an Australian business can connect it to the public phone network, what happens when someone dials 000, and when we would tell you to leave your existing system alone.
Teams Phone is a cloud PBX built into the Microsoft Teams app you already use. It gives you what a phone system does: inbound and outbound calls to real phone numbers, transfers, hold, call queues, auto attendants, voicemail, call recording and reporting.
Microsoft has renamed it more than once, which is why the same product turns up as Teams Calling, Teams telephony, Business Voice and a Microsoft Teams phone system. They all describe the same capability, and if you are comparing quotes from different providers it is worth checking they are quoting on the same thing.
The difference from a traditional PBX is that there is no box in a comms cupboard and no fixed relationship between a person and a desk. A user’s number follows their Teams account, so the same number rings on their laptop, their mobile and a desk handset if they have one. For a business with people moving between sites, working from home some days, or out on the road, that is the main practical gain.
Microsoft Teams calling between colleagues has always been free and built in. Teams Phone is what extends that to the outside world.
This is the single most common misunderstanding we see, and it is worth being precise about because it drives the budget.
A Teams Phone licence gives you the PBX. It does not give you a connection to the public phone network. Those are two separate purchases, and you need both.
It also is not included in the Microsoft 365 plans most Australian small and mid-sized businesses run on. Business Basic, Business Standard and Business Premium all exclude it. Teams Phone is an add-on licence per user, or it comes bundled inside Microsoft 365 E5 if you are on that plan. So a business on Business Premium moving to Teams Phone is adding a per-user licence cost on top of what it already pays, then adding a calling service on top of that.
Once you have the licence, you choose how calls actually reach the phone network. In Australia there are three options, and the choice matters more than most vendors let on.
Microsoft is your telco. You buy the calling minutes and the phone numbers from Microsoft alongside the licence, in the same bill, through the same admin centre.
It is the simplest option to set up and the easiest to explain to a board. The trade-off is flexibility: you get Microsoft’s plans and Microsoft’s numbers on Microsoft’s terms, which can be limiting if you have unusual numbering, existing carrier contracts, or sites that need something specific.
An Australian carrier remains your telco, but their service plugs directly into Teams. Numbers are provisioned into your tenant by the carrier from the Teams admin centre, without you building anything.
For most businesses in the 30 to 80 user range this is the option we recommend looking at first. You keep a local carrier relationship, local support and local commercial terms, without the engineering overhead of the third option.
You connect your own carrier to Teams through a Session Border Controller, either one you run or one your provider hosts. This gives you the most control and it is the only option that comfortably handles the complicated cases: keeping an existing SIP trunk contract, integrating with a legacy PBX during a staged migration, unusual dial plans, analogue devices such as lift phones and duress alarms, or multi-site arrangements that need specific routing.
It is also the most work. There is real design and ongoing operational responsibility in a Direct Routing deployment, and it is the option where an unmanaged setup will quietly cause problems eighteen months later.
| Microsoft Calling Plan | Operator Connect | Direct Routing | |
|---|---|---|---|
| Who is your telco | Microsoft | Your Australian carrier | Your Australian carrier |
| Setup effort | Lowest | Low | Highest |
| Needs an SBC | No | No | Yes |
| Keep an existing carrier contract | No | If they participate | Yes |
| Handles analogue devices and legacy PBX | No | Limited | Yes |
| Best suited to | Simple single-site setups | Most mid-sized businesses | Complex or multi-site operations |
There is a fourth option, Teams Phone Mobile, where your mobile number becomes your Teams number through a participating carrier. It suits businesses whose people genuinely live on mobiles, and it is worth asking about if that describes your field teams.
This section exists because it is the part of a Teams Phone migration most likely to be skipped, and it is the part with actual consequences.
Australian carriage service providers operate under the Telecommunications (Emergency Call Service) Determination 2019. They must give you access to the emergency call service on 000 and 112, carry the call to the emergency call person (Telstra answers 000 and transfers to police, fire or ambulance), and supply the operator with the best available location information for the service.
For a traditional PBX, “best available location information” was straightforward. The desk phone was bolted to a known building. For a softphone that follows a person between the office, home and a customer site, it is not straightforward at all.
Here is the specific thing Australian businesses need to know. Microsoft publishes how emergency call routing works country by country, and for Australia its documentation states that emergency addresses are configured and routed by the carrier partner. That is different from the way it works in some comparable markets. In Canada and New Zealand, for example, Microsoft’s documentation describes emergency calls being screened to determine the caller’s current location before routing. Australia is a carrier-configured market, so what happens on a 000 call depends on your carrier and how your service was set up, not on a Microsoft default.
The practical consequences:
None of this is a reason to avoid Teams Phone. It is a reason to make emergency calling a written requirement rather than an assumption. Before you sign, get your carrier to confirm in writing whether 000 is enabled for your numbers, whether emergency addresses are set per user, per number or per site, whether dynamic location is supported on your specific deployment, and what address is presented when a user is away from the office. Then set accurate addresses for every site, and tell your staff to state their exact location to the operator regardless of what the system is expected to send.
Yes, in almost all cases. Australian local number portability means you can bring your existing numbers across, and for most businesses that is non-negotiable because the numbers are on vehicles, signage and ten years of documents.
Two things worth planning for. First, porting is the step most likely to hold up a cutover, particularly where numbers sit across multiple carriers or in an old block nobody has touched for years. Start it early and treat the port date as the real project deadline. Second, if you are using a Microsoft Calling Plan, an emergency address has to be registered against a number when you acquire it from Microsoft or when it ports in, so the emergency address work happens during the port rather than after it.
Where a number cannot port cleanly, the usual fallback is diverting the old service to a new number for a period while you update everything that references it. That works, but it is an ongoing cost until you can retire the old service.
We are not going to publish a per-user figure, because Microsoft’s pricing varies by agreement type and billing term and any number we print here would be wrong within months. Microsoft directs customers to the Microsoft 365 admin centre for the price that applies to their tenant, which is the right place to check.
What is more useful is knowing everything that goes into the number, because the licence is usually the smallest part:
The saving, where there is one, usually comes from retiring the old PBX, its maintenance contract and its separate line rental, not from the licence being cheap. Businesses that budget only for licences are the ones that get a surprise.
Most people do not. A good headset on a laptop is a better experience than a desk handset for anyone who spends their day in Teams anyway.
The exceptions are real, though. Reception desks, warehouses, workshops, meeting rooms, lifts and any shared area where a phone belongs to a place rather than a person all still want a physical device. Certified Teams handsets exist for exactly these cases. Analogue devices such as lift phones and alarm diallers are a separate problem, and they are one of the main reasons a business ends up on Direct Routing.
We sell and support Teams Phone, and we still talk businesses out of it a few times a year. It is the wrong move when:
For most businesses in the 30 to 80 user range, yes. The cases that need more care are contact centres, sites with analogue devices such as lift phones and alarm diallers, and businesses with complex multi-site routing. All of those are solvable, usually through Direct Routing, but they turn a licensing change into a project.
Yes, once you have a Teams Phone licence and one of the three calling options above. Without a calling service attached, Teams will only call other Teams users.
Yes. Microsoft Calling Plans, Operator Connect and Direct Routing are all available to Australian tenants, and Australian carriers participate in Operator Connect. Check the Microsoft 365 admin centre with your tenant set to Australia for what your organisation can buy.
Yes. The Teams mobile app makes and receives calls on your business number, so people can work from a mobile without handing out a personal number. Teams Phone Mobile goes a step further and makes the mobile number itself the Teams number, through a participating carrier.
Calls stop, the same as any cloud phone system. Voicemail and call forwarding still work because they run in Microsoft’s cloud, so a failure rule that diverts to mobiles will keep you contactable. Sites where losing the phones is unacceptable need a designed fallback rather than a hope.
If you are considering the move, the questions worth answering before you look at licence pricing are: which of the three connection options fits your carrier situation, what your 000 arrangements will actually be, which numbers need to port and how long that will take, and where the physical phones still need to be.
Get those four right and Teams Phone is a straightforward improvement on a traditional PBX for most businesses. Get them wrong and you have a phone system that works fine until the day it matters.
We plan, deploy and support Microsoft telephony services for Australian businesses, including the carrier selection and number porting work behind a Teams Phone rollout. If you want to talk through which option suits your setup, have a look at our Teams Phone services or get in touch.
