It is a common understanding that passwords are supposed to protect our accounts. But how much does your designated password protect you and your information? If the bad guys come hacking into your personal and corporate accounts one day, how sure are you that it’s going to be a tough job for them? Let us help you assess how easy it is for a hacker to take a quick guess of your password.

Your password is your first line of defense from wrong doers in the digital world. And yet, it is something that we often overlook and take for granted. When was the last time you spent a dedicated amount of time to think about what password to use for your new account? We often just use a single password across all of our accounts to save us the time and effort. Am I right? This is a definite no-no! Using a single password for all accounts is just making a hacker’s job much easier. So what is the best way to manage passwords and protect your accounts?
In order to plan for an effective account protection strategy, let’s start with a rundown on how hackers guess passwords:
Although you can’t really call it ‘wild.’ These hackers are trained to squeeze the juice out of your public information just to get a list of sophisticated guesses to your password. They use sophisticated programs and procedures to ultimately catch that one ticket into your personal data.
Sadly there are lurkers who discreetly stick their heads out from behind your shoulder as you type in your password, prying on what you type and browse. Don’t underestimate them – always be cautious of who can see your information in your surroundings.
There are some hackers who are so hard working that they would endure matching your personal data with every word in the dictionary. Yes, they exist. They would browse through every possible word to partner with, for example, your birth month, in order to guess your passwords.
Be careful of strange emails that you find in your inbox – this might be a phishing attack. They might be schemes sent by scammers who are trying to lure you into clicking and opening malicious files that intend to steal your personal information. As of October 2018, phishing activities has already cost victims $47,676 of loss this year (source: scamwatch.gov.au). So beware of being tricked into opening an email about winning a brand new car and clicking on links.
As the label implies, it’s a pretty vicious attack on your accounts. All the hacking techniques mentioned above are used on your account to track your keystroke and eventually get whatever important data can be stolen from you.
Knowing these hacking strategies and your current password choices, can you confidently say that your accounts are safe? Now that you already have an idea how cyber criminals do it, here are some ways on how you can minimise your risks:
I know people will usually recommend starting at 6 but, it wouldn’t hurt to add in two more characters if it means increasing your security because nowadays, the longer your passcode is, the more time a hacker needs to spend cracking their way into your account.
To make it harder to track and follow your keystrokes, you might want to utilise as much letters and characters as you can.
Remember that most of the time, the people who are trying to hack their way into your account already know enough about you. Don’t use a word or phrase that can be obviously related to you.
What I mean by this is that you can use words that are hard to “guess” and identify. Maybe use that one phrase you came up with in primary school that nobody understood.
Hackers can track your keystrokes in order to decipher which letters or characters you are constantly using. Making your password random can help minimise the risk of getting your usual password input tracked and followed by cyber criminals.
You can also have a look at an infographic of an anatomy of a secure account to have a more comprehensive view of how you should be securing your accounts.

Don’t take your password for granted and take the easy way out, rather than thinking of a good one. And if you’re like me who tends to forget anything (and everything), including passwords, there are tons of useful tools and apps that you can use to store your precious security passcodes.
Here are some of the more well known password management programs.
1. LastPass
One of the top on the list of best password managers. It features advanced hashing that provides a secure haven for your passwords. It runs across a wide range of operating systems and is free of charge unless you want to buy Premium subscription. Having the free version is not bad at all with 2 Factor Authentication feature and a robust password generator.
2. Dashlane
Aside from keeping your password safe. Dashlane also has a feature called digital wallet where you can safely manage your credit card information so you can securely make online purchases. It also allows you to sync your data to the cloud so you can access your passwords wherever.
It is one of the most user-friendly password applications in the market. It may look a little outdated but works as well as the other ones already mentioned. It provides secure management for an unlimited number of passwords. It is free of charge unless you upgrade to premium then you can sync your data into different devices.
4. bitwarden
It is an open source software (which means it’s free!) that features 2-Factor Authentication, end-to-end encryption and enables syncing to multiple devices without limits. It also boasts a password generator and runs through multiple operating systems.
At Grassroots IT, we recommend the BEST way to protect your accounts is using Multi Factor Authentication (MFA). So that even if the hackers guess your passwords, they still need a real-time authenticator to get into your accounts. Read more about that over here.
It can be easy to overlook such a thing as your account passwords but we really do live so much of our lives online these days, that it’s become increasingly important to be vigilant about protecting our personal information and corporate data. If you need any help setting up some additional security for your personal accounts, don’t hesitate to make a time with us.
Back to more news, updates and resources or learn more about Cybersecurity
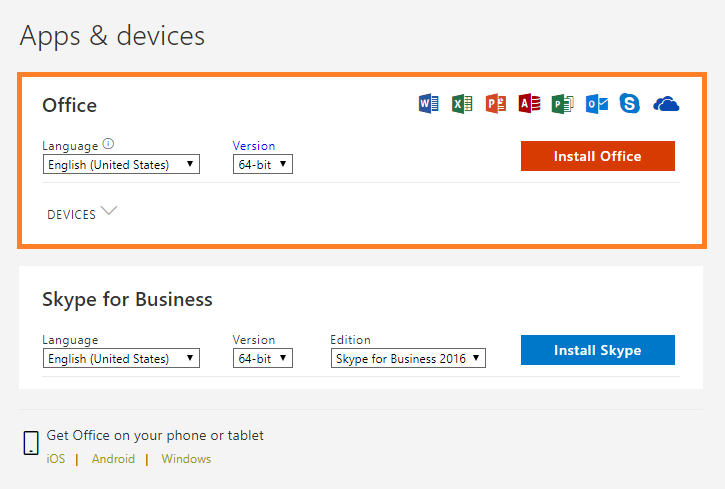
A lot of Microsoft Office 365 plans include what’s called Desktop Licensing. This is the bit that lets you install the Microsoft Office applications such as Word and Excel on your computer. In this post we show you how to install Office 365 on your computer.
1. Sign in with your work or school account at https://portal.office.com/OLS/MySoftware.aspx.
Note: If you don’t see Office listed, your plan probably doesn’t include Office applications. If you know your plan includes Office, you may not have a license assigned. See What Office 365 product or license do I have? If Office is not listed, ask your Office 365 administrator to assign a license to you.
2. On the Office page, set-up which version of Office 2019 you want to install. By default, the 64-bit version is selected. You can change this by clicking on the drop-down box under Version.
IMPORTANT: The process that installs Office 2019 also uninstalls all Office 2016 products. If you previously have the 32-bit version of Office installed, you should first uninstall this version before upgrading to the 64-bit version.
If you’re not sure which version you currently use, have a look at What version of Office am I using? or if you’d like to know which version you should install, read on Choose between the 64-bit or 32-bit version of Office.
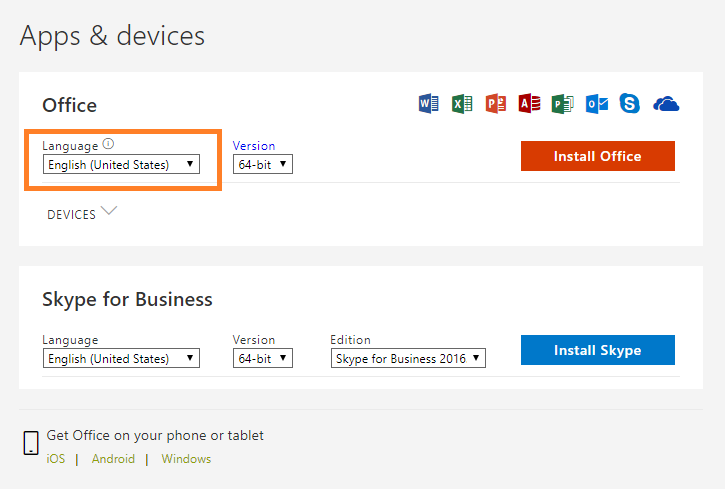
3. Select a preferred Language from the drop down list under Language.
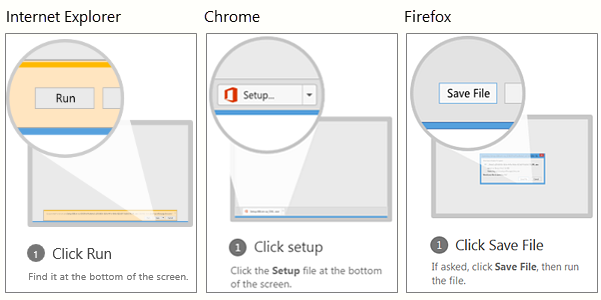
NOTE: If you’re using Edge, first click Save, and then click Run.
If you see the User Account Control prompt that says, “Do you want to allow this app to make changes to your device?” Click Yes.
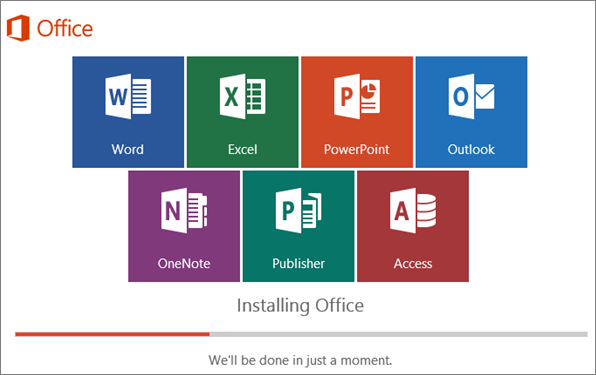
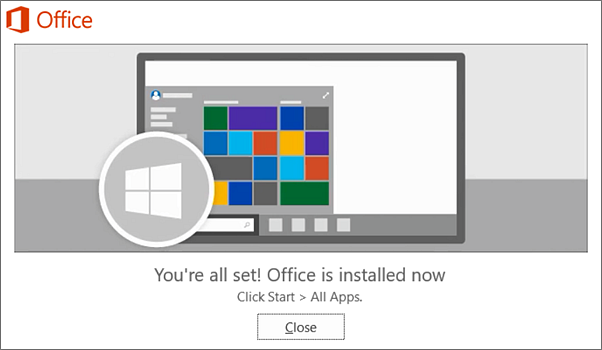
6. The install begins…
7. Your installation of Microsoft Office 365 is finished when you see the phrase, “You’re all set! Office is installed now”and an animation plays to show you where to find your Office applications on your computer. Follow the instructions in the window.
For example Click Start > All Appsto see where your apps are, and select Close.
8. Start using an Office application right away by opening any app such as Word or Excel. In most cases, Office is activated once you start an application and after you agree to the License terms agreement by clicking Accept.

Now you’re ready to use Office 365!
If you’re curious as to how other successful businesses utilise the Office 365 suite to the best of their advantage, you can head to one of our free webinars by clicking here or if you’re looking for new features and new ways to work your way around your freshly installed Office 365, click here.
Right when you need professional assistance in your Office 365 journey, we’d be glad to be there and help! Just reach out to us and let’s talk about how you can make the most out of your Office 365.
Are you ready to get solutions that drive positive change to your business? Reach out to us to know more about how we can build these solutions together.
There is one app on my iPhone that I now simply cannot live without. The app is called Office Lens and it is available for free at the Apple App Store and for your Android phone on Google Play.
In a nutshell, the Office Lens app is a portable scanner in your pocket. Now, these kinds of apps aren’t new. You have Evernote, Scanbot and no doubt a variety of other flavours available to you on your Smartphone but where Office Lens shines is in its tight integration with the Office 365 suite.
If you are rocking Office 365, odds are that you already enjoy the mobility and agility of access to all your documents and productivity applications from anywhere on your phone. Here is another tool in your toolbox to get the most out of the modern workplace.
Here are just some of the ways that I have personally used Office Lens in the past few weeks:
I have been fortunate to attend some fascinating road shows hosted by cloud companies who are making fantastic presentations up on the big screen. Problem is, you’re often seated at a weird angle off to the side, right? You will see people snapping pics of the big screen at these kind of events, which is a great way of capturing the information. But, if you are using Office Lens, the image will automatically identify, keystone (correct the angle of the image for ease of viewing) and save with an optimised image where you can store it away in a OneNote file to annotate and comment so that you can more easily document and retain all of the cool stories on display.
Collected a pile of business cards at that networking event? Snap them in Office Lens and the app will automatically identify the printed text with optical character recognition (OCR) and generate contacts that you can add right into your phone. Handy.
When compiling expenses, having to dig out all those paper receipts can be tedious. Instead of being monopolising the office scanner in a scanning marathon, Office Lens enables you to snap a photo with your phone at the time. Office Lens will automatically crop, enhance and clean up the image and export it to your OneDrive as a PDF document ready to attach to your expense claim. Job done.
Sounds good, right? But how do you do it?
Have you given Office Lens a run yet? I’d love to hear how you are using it in your business.
Have you ever experienced that sinking feeling as you realise you have accidentally sent an email to the wrong person?
If you are lucky, it could just be an embarrassing blip on your day, but there is the potential for some very real damage. There is the occasional story on the news, for example the story about the insurance company that accidentally sent out an email dismissing its entire workforce, instead of just firing “Terry from Accounts.”
So yes, sending an email to the wrong person or group can be embarrassing. Fortunately, there are measures you can take to prevent such disasters.
Yes. There are measures that you can take to avoid the embarrassing debacle but regardless of the technology, just like it is with cybersecurity the first line of defence should always be you.
In all cases, you should read the “To”, “CC” and “BCC” fields before you click on that Send button. Check what attachments are in the email and give the content in the body a once over. In fact, maybe write the email first and THEN add the addresses carefully at the end. And then double check that you’ve selected the correct email addresses.
Beware of that ever so helpful feature in Outlook where it autocompletes the address! I was once injected into a river of emails between the management team of a retailer containing discussions about stuff that I really had no business knowing after an employee had unwittingly rapped out “Gary” on their Address field. Even after advising them, I continued to receive emails for some time.
Always proof read your emails.
A very wise manager I once worked with had an excellent tactic to protect himself against the risk of the wayward email. He would set a rule in his Outlook to delay the transmission of his emails and allow himself some time to review and reflect before he pulled the trigger.
It’s not hard to do, and it can help you from some potential bad news be it an email launched into the wrong inbox, or an email to the right inbox that was banged out in haste.
Let’s guide you through how to do it, step-by-step.
How to set a rule to delay emails
1. While composing your message on Outlook, go over the Ribbon and click on the Options

2. Under the Options tab, click Delay Delivery
3. A new window will appear with the delivery properties of your message. You’ll want to go over to the Delivery Option section
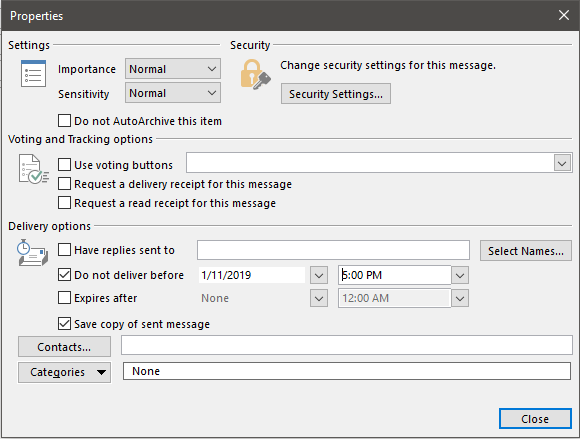
4. Under Delivery Options, pick a date from the date picker of until when you want to delay your email delivery
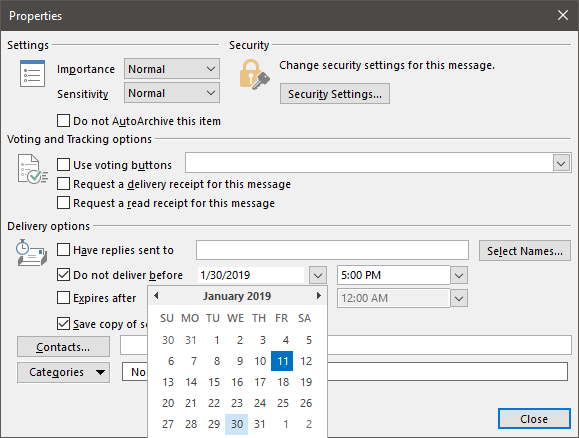
5. After choosing a day on when your email will be delivered, pick a specific time to send it out
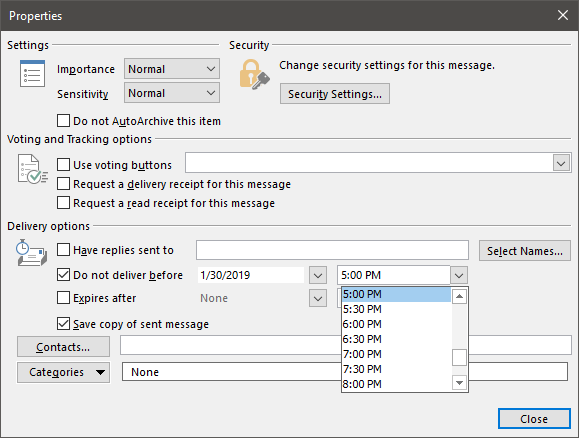
6. Close the window by clicking the Close button on the lower right part
So, you have checked and double checked, and your email is sitting there in the ‘Sent’ tray.
You can try to recall the message from the recipients by using the Recall This Message feature in Microsoft Outlook. This lets you recall, replace or delete the messages sent.
The success or failure of a message being recalled depends largely on their mail system and settings and whether they want to let you recall it, which is probably the single best reason why this method is probably not the best one to use. There’s also the fact that recalling a message will generally inform the recipient that the email exists and highlight the fact that you want to recall it.
You can think of it like stopping a bullet in flight. This is one of your last resorts.
1. From your Sent Items folder, double click the email you’d like to recall.
2. Click on the Actions icon

3. From the Drop-down menu, click on Recall This Message
4. A dialog box would then appear to confirm how you want to recall your email
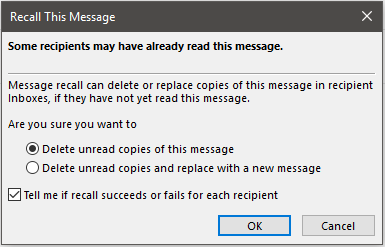
5. You can choose whether you’d like to receive notifications about your recall and track its activity.
6. Close the dialog box by clicking Ok

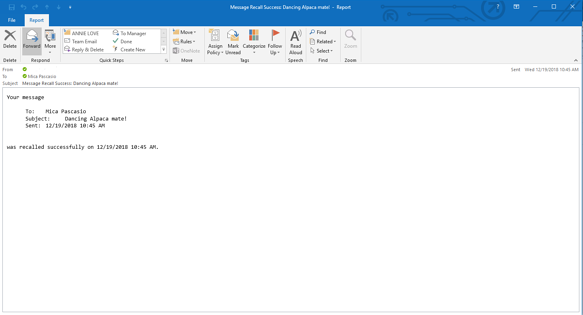
7. If you chose to get a notification, you should get an email confirming that the recall process was a success. It should look like this:
Email disclaimers inform recipients about what they can and cannot do with the emails sent from your organisation. In fact, in North America and Europe having an email disclaimer is now a legal requirement, in Australia it’s simply a matter of good sense.
For sensitive emails, it’s advisable to include a message that states for whom the message is intended and that sharing the content is strictly forbidden. For wayward emails to the random public, a humble request to inform the sender in case the message was intended for someone else will often work.
Here at Grassroots IT we use an excellent tool called Exclaimer! for helping to manage and control the email signatures. It means that we can have a consistent branding for all our email communications and focus on what we like to do, which is to help you do your best work possible through the best possible use of technology. It also means that we can add in and adjust information like disclaimers whenever we need to.
Recalling emails in Outlook is possible, but we recommend it as a last resort. Check, check and recheck before you send – especially if the topic is a bit controversial or includes highly private and confidential information.
For most of us, the goal of achieving Inbox Zero (“a rigorous approach to inbox management, aimed at keeping the inbox empty”) is not an easy task to work on. It’s just a lot to have to go through tons of emails from who-knows-when with the goal of clearing up unwanted emails from your Outlook Inbox then, as soon as you finish halfway through your emails, you start to realise that newer ones are replacing those that you have just removed. So what the heck is the point?
Well, what if I tell you that there’s a way to reduce the amount of redundant emails sitting around your Inbox?
Enter, Microsoft Outlook. There is a feature within Outlook called Conversation Clean Up that helps in clearing out unwanted emails by evaluating the contents of your email conversations. From there, it eliminates any emails with redundant content from previous conversations.
“What the what?!” You might think. Here, let’s go through it in more detail
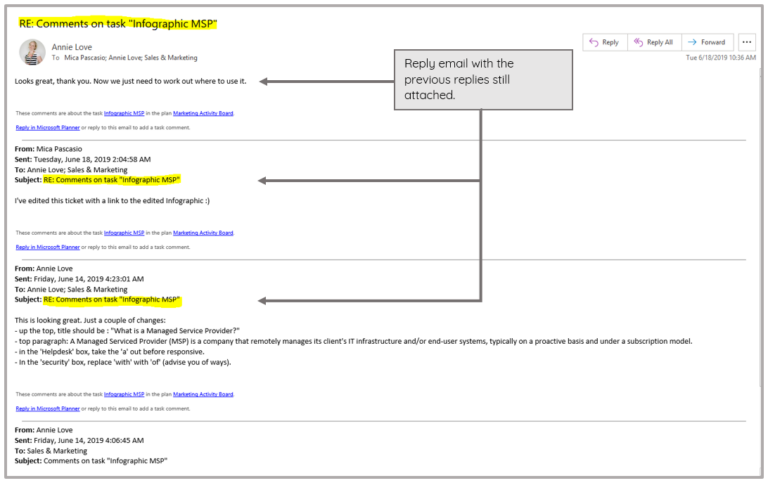
Does an “email thread” ring a bell? Well that is the quickest definition of an Outlook Conversation. “A Conversation is the complete set of email messages from the first message through all responses. The messages of a Conversation have the same subject.” (source: support.office.com)
Here’s an example, If I send an email to you, then you send me a response with MY original email still attached to YOUR reply then that, my friend, is a Conversation. Here’s a sample image to draw a clearer picture:
This tool is most helpful with your emails that contains a lot of ping-pong responses, especially those with many recipients. Now, how do you utilise this cool Outlook feature?
“I’d like to remove redundant email messages.”
1. Open your Outlook desktop app.
2. Find one of your emails or email folder that has a lot of back and forth responses, open it.
3. Go to the Home tab.

4. From the Home tab ribbon, find the Delete group.

5. Click on Clean Up (a drop down list will appear).
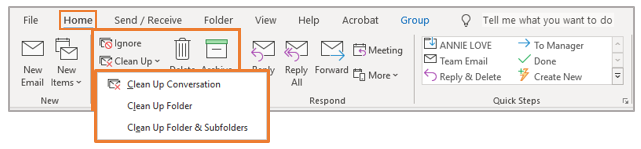
You can select one of the options from the drop-down list:
This is the option for when you want your current Conversation be reviewed, and redundant messages be deleted.
This option allows you to have all email messages in your selected folder be reviewed, and redundant messages be deleted.
This will allow you to have all email messages in your selected folder and its subfolders be reviewed, and redundant messages be deleted.
Not entirely. Once you’ve enabled the Conversation Clean Up on one of your emails, email folders and subfolders, detected redundant messages will be moved to your Deleted folder and not eradicated permanently. If you wish to recover some of the most recently removed emails, you could head to the Deleted folder to find them (although we don’t recommend using your Deleted folder as a storage option!). But remember that the redundant information should still be located in the email you are keeping, that hasn’t been ‘cleaned up.’
You can also set an exception for emails that you do not want to be moved out of your main Inbox. You can find more details on how you can customize your options in one of Microsoft’s support docos available on their page.
There are more ways than one for you to strategize your way to Inbox Zero without having to sacrifice loads of your precious time. Here are a few handy tips:
This may sound cliched but, “Time is Gold.” Especially if you’re running a business, you can’t afford to use up a day or give it an hour just to sort out your overflowing inbox to eliminate the unwanted ones. Ideally, if you make deleting (and unsubscribing from promotional emails you no longer read) a regular habit, it’s less likely you’ll need to deal with tons of emails when you next face your inbox.
Do you feel guilty and anxious when asked to get rid of an old email you’re afraid you might need someday because it has a file attached? Just download all the files and links from emails that you find important so they are safely retained, then delete the email. Magic.
Besides the Conversation Clean Up Tool, there are a lot of tools in Outlook that can help you clean and organise your inbox. You just have to start exploring your Outlook ribbon or head to the handy Outlook help website for more ideas. Or seek for the assistance of your trusted IT partner who can give you pointers on where to find the handy tools.
Like your rubbish at home, you wouldn’t want to keep it hidden under the sink for too long. Once you’ve read an email that can be deleted or you’ve finished a conversation, make sure to get rid of it right away to prevent it from being buried under newer emails that will later on make it harder to find.
Inbox Zero can be a lofty goal, but not unachievable. A daily habit of action to remove unwanted emails and the use of handy tools like Conversation Clean Up can help you keep on top of inbox clutter.
People do business with people, so your profile picture is a great way to represent you and your business. Whenever you send an Outlook email to your contacts, a little circle icon of you should be visible to the recipient and it should be something striking. Who wouldn’t want to look good in their email profile picture, right?
The members of your organisation would appreciate it if they can easily identify you in online collaborations and communication within Office 365. To maintain a personalised touch to your account, you should consider updating your profile picture and we can show you how to do that.
Here’s a video tutorial of how you can easily change your profile photo in Office 365 online:
Here’s another short and simple way to do it:
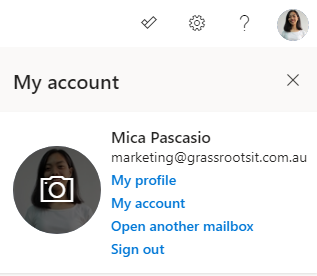
1. Find a little circle at the top of the page. That’s where your photo is supposed to be, select it.

2. A list of options will appear, hover over the profile photo where you will see a camera icon. Click on it
3. A window will appear. Select +Upload a new photo

4. Select your favourite photo from your file folders. Click Open
5. After choosing a photo to use, click Apply

6. Select Done

To recap the steps:
If you would be needing more help with your Office 365 account, contact your reliable IT partner or don’t hesitate to reach out to us. The #nerdherd would be glad to assist.
Are you ready to get solutions that drive positive change to your business? Reach out to us to know more about how we can build these solutions together.
CEO’s play a vital role in protecting their business from cybersecurity attack, however for many CEO’s, the world of cybersecurity leaves them feeling confused and vulnerable. This is perfectly understandable given the complex and rapidly changing nature of security threats facing all organisations. So how does a CEO properly secure their business? The good news is that there is no need to become a cybersecurity expert! Here are our top 5 cybersecurity tips for CEOs to help their organisation stay safe from online attacks.
In the past, cybersecurity was a technical IT responsibility. However, cybersecurity has been developing more into a business driver rather than a technology issue for some time. That’s why it’s important to ensure board level buy-in and support.
The main ways that CEOs can gain buy-in from their board are:
A cybersecurity plan is something every staff member, at every level, must be aware of. This means that if a breach occurs, everyone knows what to do.
A cybersecurity plan should include:
This plan can also be called a ‘Crisis Management Plan’, which you can learn more about in our blog ‘5 questions board members need to ask’.
Cybersecurity is not a one-size-fits-all kind of investment. Many companies – especially SMEs, Non Profit organisations and start-ups – struggle to make the right security choices. Yet choosing cheaper options will end up costing more in the long term.
Cybersecurity is more than just having anti-virus software in place. The best cybersecurity measures are outlined in the Essential Eight Framework, as identified by the Australia Cyber Security Centre.
Essentially, your cybersecurity needs to cover:
The chance of experiencing a ransomware breach in today’s world is high, so it’s important to quickly identify when an attack has occurred. The sooner a breach has been identified, the better!
The main things for a CEO to understand are:
All company departments and employees should be involved in protecting the company’s valuable and sensitive data. Crafting a culture where all employees see themselves as having an active cybersecurity role is the key to addressing an inevitable ransomware attack. It’s important that this culture starts at the top with the CEO.
Three ways to help create this desired culture are:
Understanding ransomware and what to do when it occurs is the job of a CEO. By implementing the above 5 cybersecurity tips for CEOs, you will be well on your way to properly protect yourself from a ransomware attack, and ensure your company isn’t tomorrow’s news!
Engaging with an IT partner doesn’t need to be an all-or-nothing exercise. In many cases organisations will partner with an IT provider to work alongside existing in-house IT staff to provide complementary skills and capabilities. When choosing a IT partner to work alongside in-house IT staff it’s important to choose one familiar with a Co-managed IT model to ensure a productive, harmonious engagement.
Here are the top 5 ways that a Co-managed IT partner will be able to work alongside your existing IT staff.
In some cases, companies may have internal IT staff who are well capable of taking care of day-to-day IT management support and project delivery. Yet senior business leaders may still need additional support in building an overall IT strategy for your IT staff to execute. Choosing a Co-managed IT partner will give you the confidence that your technology is aligned with your long-term business strategy, helping manage growth, improve profit and drive positive change.
Companies with in-house IT staff may find there is still a gap in the management and execution of IT strategy into the organisation. Choosing a Co-Manage IT partner who can provide ongoing IT management support will ensure a smooth execution of any agreed IT strategy. Your IT partner will also ensure your IT staff stay focused and accountable on executing IT initiatives throughout the business.
It’s common for existing in-house IT support staff to become consumed with day-to-day help-desk support for staff and clients. This in turn doesn’t give them time to work on bigger picture IT strategies, planning and execution. Partnering with a Co-managed IT provider can help provide help-desk and service desk support for your company, allowing existing in-house resources – whether technical or management – to focus on higher value activities within your organisation.
A Co-managed IT partner can provide project delivery capabilities to help companies deliver IT initiatives requiring specialist technical skills that your in-house IT staff may not have, such as Microsoft Office 365 migrations and process automation development. These IT capabilities can be complex, and something you want to implement correctly the first time.
In-house IT support staff may manage the incidents and problems that occur in your system, but may not have the higher level technical skills or experience to handle the more complex and involved issues. The right Co-managed IT partner can provide that higher level escalation support, from both a generalist perspective and a more specific product area. For example, in house IT support may handle all day-to-day help-desk requests, and then escalate the more complex or time consuming issues to your Co-managed IT partner.
As you can see, investing in the right Co-managed IT partner can provide additional IT support in a more targeted and specific way, becoming an extension to your IT team. In the digital world that we live in today, you can never have too much support when it comes to your business IT needs.
A cybersecurity breach can be extremely disruptive and expensive, potentially resulting in significant downtime and lost productivity, permanent loss or public exposure of confidential information, reputational damage and direct financial loss. The potential impact of a security breach could be devastating or potentially fatal to any organisation. That’s why cybersecurity should have oversight at the highest level.
A robust cybersecurity strategy will also call on resources from across the organisation, including finance, human resources, IT, and operations. To gather this appropriate support and commitment from across the organisation requires a suitably senior authority to champion the cause.
Here are the 5 cybersecurity questions board members need to ask.
Although board members don’t need to have a deep technical knowledge of the organisation’s cybersecurity defences, some understanding of the systems that are in place is important. Equally critical is an understanding of how these systems are resourced and managed on an ongoing basis, as well as how the board will be kept informed.
Cybersecurity is not a “once-and-done” proposition; it’s one that must be actively managed. Are your security measures current and always evolving to keep up with new and more sophisticated threats? Are they being audited regularly to identify gaps and ensure compliance with established standards? Are your systems proactively tested, such as with mock attack scenarios and penetration testing?
In the event of a successful cybersecurity attack against your organisation, a rapid response is critically important to limit the extent of the attack and minimise the potential impact. The longer a successful attack is allowed to remain in place, the further it may spread and the more complex and expensive it may become to resolve.
As a board member you should satisfy yourself that any security breach will be rapidly identified and responded to. Ask:
Instead of considering how your organisation will respond if a breach occurs, think instead in terms of responding when a breach occurs. Assume that a breach will occur and plan accordingly by having an incident response plan in place.
At a basic level, a cybersecurity incident response plan should include:
When you’re thinking about how the organisation will respond in the event of a security breach, there are three plans of critical importance. Satisfy yourself that all three plans are in place, and are reviewed and tested on a regular basis.
In many cases, when recovering from a security breach the organisation may need to recover lost or damaged data from backup. The backup plan should detail how the organisation backs up important data, and how often? What is included in the backups? How often are the backups tested? How secure are the backups if a security breach occurs?
A disaster recovery plan details how the organisation will recover from a disaster, such as a security incident. Disaster recovery will often rely on the backup plan, but will also consider how the backups are to be used, what order systems are to be recovered in, how long recovery efforts may take, and what additional resources may be required, such as new data centre equipment or cloud tenants.
A security breach may result in significant disruption to business operations, with key systems rendered useless. A business continuity plan should address how the business may keep operating (even at reduced capacity) while the security incident is addressed and business systems recovered to an operational state.
Cyber insurance can help not only with the immediate response to an incident, but also with immediate and longer-term recovery efforts. Ensure you understand the scope and limitations of cyber insurance policies, that sufficient coverage is in place, and satisfy yourself that all policy obligations are being met by your organisation to ensure any claims are not denied. Cyber insurance may cover:
Many businesses are already enjoying the benefits of cloud-based VoIP PBX systems alongside Microsoft Teams. By replacing your existing phone system with Teams Phone (previously known as Teams Calling), the communications experience is unified and simplified into the familiar Teams platform while maintaining professional features and user experience.
Teams Phone is a 100% cloud-based VoIP phone system built right into the familiar Microsoft Teams application, allowing you to make phone calls using Teams. For organisations using Microsoft 365, Teams will already be a familiar tool for collaborating with colleagues via chat, voice, video and shared files. With the additional of Teams Phone users can now make and receive phone calls using the same familiar Teams application, rather than having yet another separate application for phone calls.
Teams Phone is the next evolution of business voice telephony, unifying cloud telephony in the familiar Teams environment. There are many advantages not only over traditional PBX phone systems, but also over other VoIP and cloud-based PBX systems.
Because it is a 100% cloud-based platform, supporting a diverse and remote workforce is easy. Staff can not only work from any location, but moving between locations is seamless. As modern working arrangements increasingly see staff sharing their work hours between home and office locations, this helps them stay in touch wherever work takes them.
Multiple offices have traditionally meant multiple separate phone systems. By using Teams for all of your phone calling, you can bring all offices together for a seamless user experience and improved customer service, breaking down the limitations of geographic separation to unite teams across locations.
Organisations using Teams Phone can easily operate a single customer service team spanning multiple locations, whether this be a single receptionist answering calls for different offices or a large team of specialists providing technical support.
Because Microsoft Teams can truly operate on any device, from any location, so too can Teams Phone. Users can choose to make and receive phone calls on any iPhone or Android device, computer or even a physical telephone handset. For example, a salesperson using their computer headset to make calls from their desk will still be seamlessly contactable via the Teams client on their iPhone while on the road.
Many organizations already enjoy the benefits of Office 365 and Microsoft Teams for team communication and collaboration. By bringing multiple services and channels such as chat, video calling, file management, document co-authoring and phone calls into a single unified environment, users will have rapid access to the people and resources they need, with minimal context switching between different systems and platforms.
Microsoft Teams Phone integrates seamlessly with Microsoft Power BI for advanced business intelligence reporting and analytics. By using Power BI to report on your telephony usage across the organisation, you will be able to identify opportunities to improve customer service, streamline processes and reduce costs.
The Microsoft Teams telephony solution allows your monthly costs to flex up and down as your business needs change over time. The necessary licenses operate under the same model as other Microsoft 365 licenses, meaning that you can add and remove licenses as you add and remove staff.
Yes. Because Teams Phone is a 100% cloud-based business PBX phone solution capable of supporting small teams all the way to thousands of users, many businesses have replaced legacy PBX and VoIP phone systems and are now using Teams calling rather than legacy calling platforms.
Teams Phone supports all common PBX functionality including:
Yes. Through a process called Number Porting it is possible to keep your existing phone numbers. Number Porting is the process whereby your existing phone numbers are moved from your old telephony provider to a new provider. This process can be complex and needs to be closely managed as part of your implementation in order to avoid disruption to your ability to receive phone calls.
Although the most common way to use Teams Phone is with a headset connected to your computer, you can also use the Teams mobile app on your iPhone or Android device, or with a more traditional physical telephone handset from brands such as Yealink.
In practice physical handsets are most common in shared-use scenarios, such as in a staff lunchroom or a conference phone in a boardroom.
For those users with multiple devices such as an iPhone and a physical handset, Teams will allow them to transition effortlessly between the two without missing a beat.
As with all other Microsoft Office 365 services, licensing is on a per-user basis. In addition to their standard Microsoft Office 365 license, each user will also need either a Phone System or Business Voice license costing around $11 per month.
With all users properly licensed to unlock phone features you will also need a calling plan or SIP lines to carry calls between Teams and the traditional telephone service providers. Costs can start as low as $5 per month, however, will vary widely depending on several factors such as how many concurrent calls you need to support, and whether calls are included, or charged on a usage basis.
Finally, you may have other costs to consider such as inbound number ranges, and once-off porting costs to bring existing number ranges into Teams.
Teams Phone is an excellent extension to the features already available in Microsoft Teams, with its ability to replace a traditional phone system, support a remote workforce, use any device, unify communications channels and its flexible pricing model. Learn more about how Grassroots IT can help with Teams Phone today.