4 tips for avoiding an embarrassing mistake
Have you ever experienced that sinking feeling as you realise you have accidentally sent an email to the wrong person?
If you are lucky, it could just be an embarrassing blip on your day, but there is the potential for some very real damage. There is the occasional story on the news, for example the story about the insurance company that accidentally sent out an email dismissing its entire workforce, instead of just firing “Terry from Accounts.”
So yes, sending an email to the wrong person or group can be embarrassing. Fortunately, there are measures you can take to prevent such disasters.
Measure 1: Use Common Sense
Yes. There are measures that you can take to avoid the embarrassing debacle but regardless of the technology, just like it is with cybersecurity the first line of defence should always be you.
In all cases, you should read the “To”, “CC” and “BCC” fields before you click on that Send button. Check what attachments are in the email and give the content in the body a once over. In fact, maybe write the email first and THEN add the addresses carefully at the end. And then double check that you’ve selected the correct email addresses.
Beware of that ever so helpful feature in Outlook where it autocompletes the address! I was once injected into a river of emails between the management team of a retailer containing discussions about stuff that I really had no business knowing after an employee had unwittingly rapped out “Gary” on their Address field. Even after advising them, I continued to receive emails for some time.
Always proof read your emails.
Measure 2: Delay Sending your emails
A very wise manager I once worked with had an excellent tactic to protect himself against the risk of the wayward email. He would set a rule in his Outlook to delay the transmission of his emails and allow himself some time to review and reflect before he pulled the trigger.
It’s not hard to do, and it can help you from some potential bad news be it an email launched into the wrong inbox, or an email to the right inbox that was banged out in haste.
Let’s guide you through how to do it, step-by-step.
How to set a rule to delay emails
1. While composing your message on Outlook, go over the Ribbon and click on the Options

2. Under the Options tab, click Delay Delivery
3. A new window will appear with the delivery properties of your message. You’ll want to go over to the Delivery Option section
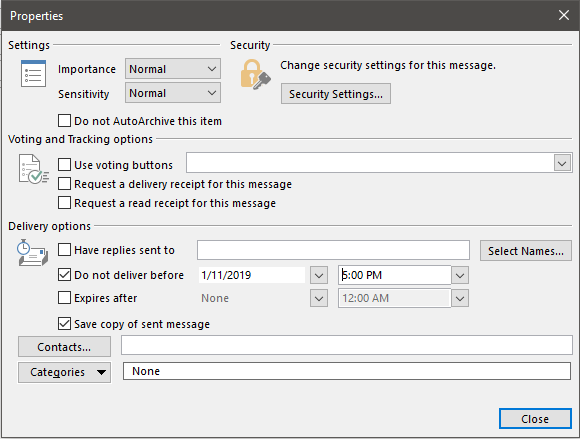
4. Under Delivery Options, pick a date from the date picker of until when you want to delay your email delivery
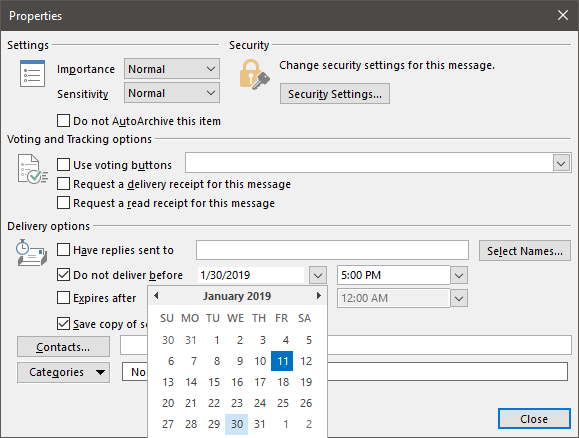
5. After choosing a day on when your email will be delivered, pick a specific time to send it out
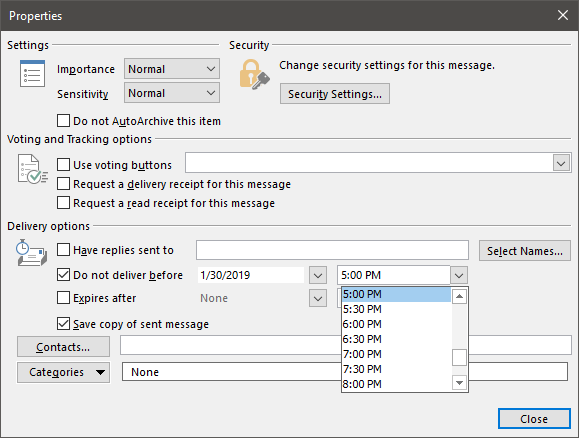
6. Close the window by clicking the Close button on the lower right part
Measure 3: Recall the Message
So, you have checked and double checked, and your email is sitting there in the ‘Sent’ tray.
You can try to recall the message from the recipients by using the Recall This Message feature in Microsoft Outlook. This lets you recall, replace or delete the messages sent.
The success or failure of a message being recalled depends largely on their mail system and settings and whether they want to let you recall it, which is probably the single best reason why this method is probably not the best one to use. There’s also the fact that recalling a message will generally inform the recipient that the email exists and highlight the fact that you want to recall it.
You can think of it like stopping a bullet in flight. This is one of your last resorts.
How to recall an email using Outlook
1. From your Sent Items folder, double click the email you’d like to recall.
2. Click on the Actions icon

3. From the Drop-down menu, click on Recall This Message
4. A dialog box would then appear to confirm how you want to recall your email
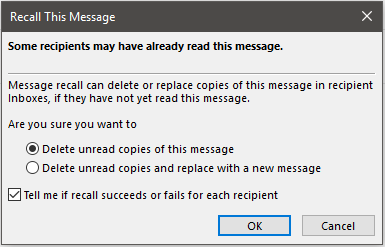
5. You can choose whether you’d like to receive notifications about your recall and track its activity.
6. Close the dialog box by clicking Ok

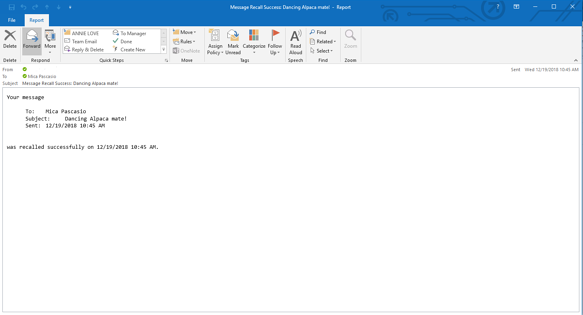
7. If you chose to get a notification, you should get an email confirming that the recall process was a success. It should look like this:
Measure 4: Disclaimer
Email disclaimers inform recipients about what they can and cannot do with the emails sent from your organisation. In fact, in North America and Europe having an email disclaimer is now a legal requirement, in Australia it’s simply a matter of good sense.
For sensitive emails, it’s advisable to include a message that states for whom the message is intended and that sharing the content is strictly forbidden. For wayward emails to the random public, a humble request to inform the sender in case the message was intended for someone else will often work.
Here at Grassroots IT we use an excellent tool called Exclaimer! for helping to manage and control the email signatures. It means that we can have a consistent branding for all our email communications and focus on what we like to do, which is to help you do your best work possible through the best possible use of technology. It also means that we can add in and adjust information like disclaimers whenever we need to.
Recalling emails in Outlook is possible, but we recommend it as a last resort. Check, check and recheck before you send – especially if the topic is a bit controversial or includes highly private and confidential information.